

Connect IM chats to Wakers and manage routing, requests, and experts.
@Waker turns an existing IM discussion into work that can continue over time. Team members stay in the original chat while QoderWake uses its context, routes each request to a suitable Waker, and returns progress, results, and files. A group needs only one bot even when several specialized Wakers work behind it.
Start with a development, customer-support, incident, or content-operations chat that already has useful context. For merges, releases, production changes, or external publishing, require the Waker to present its plan and risk first and wait for human confirmation.
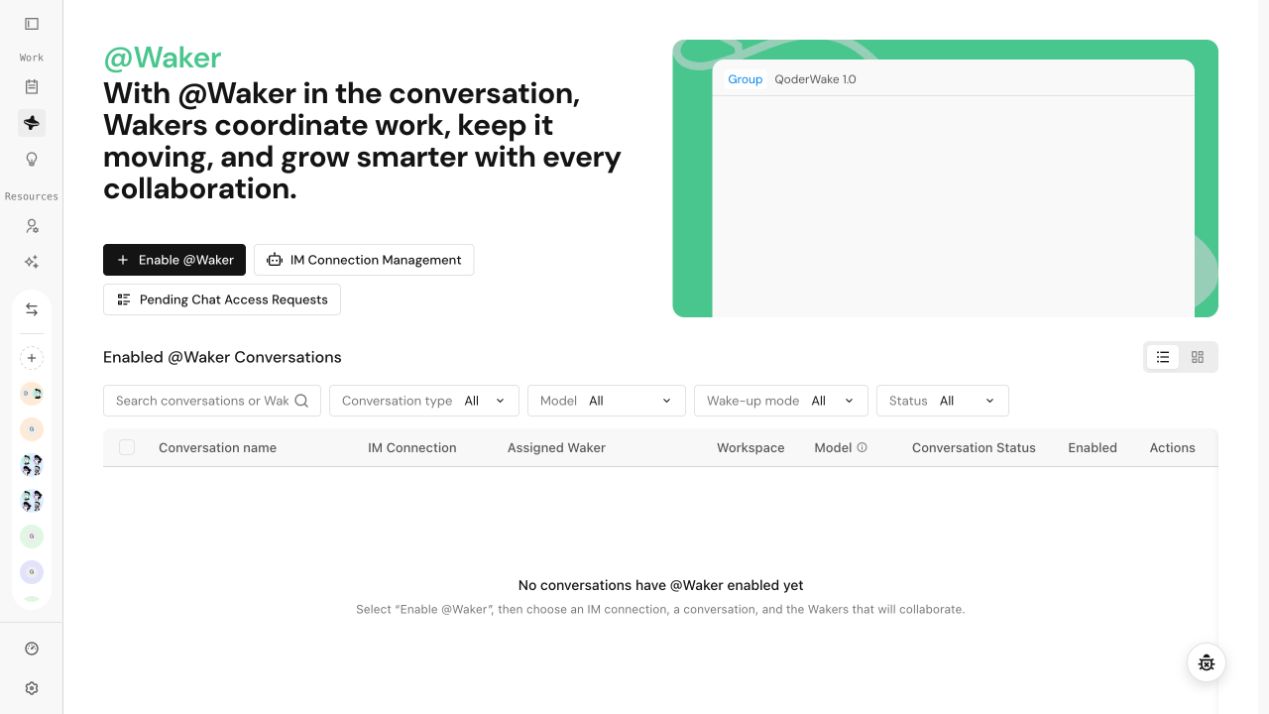
Path: @Waker → IM Connection Management. The page shows only connection types available to the current region, account, and release.
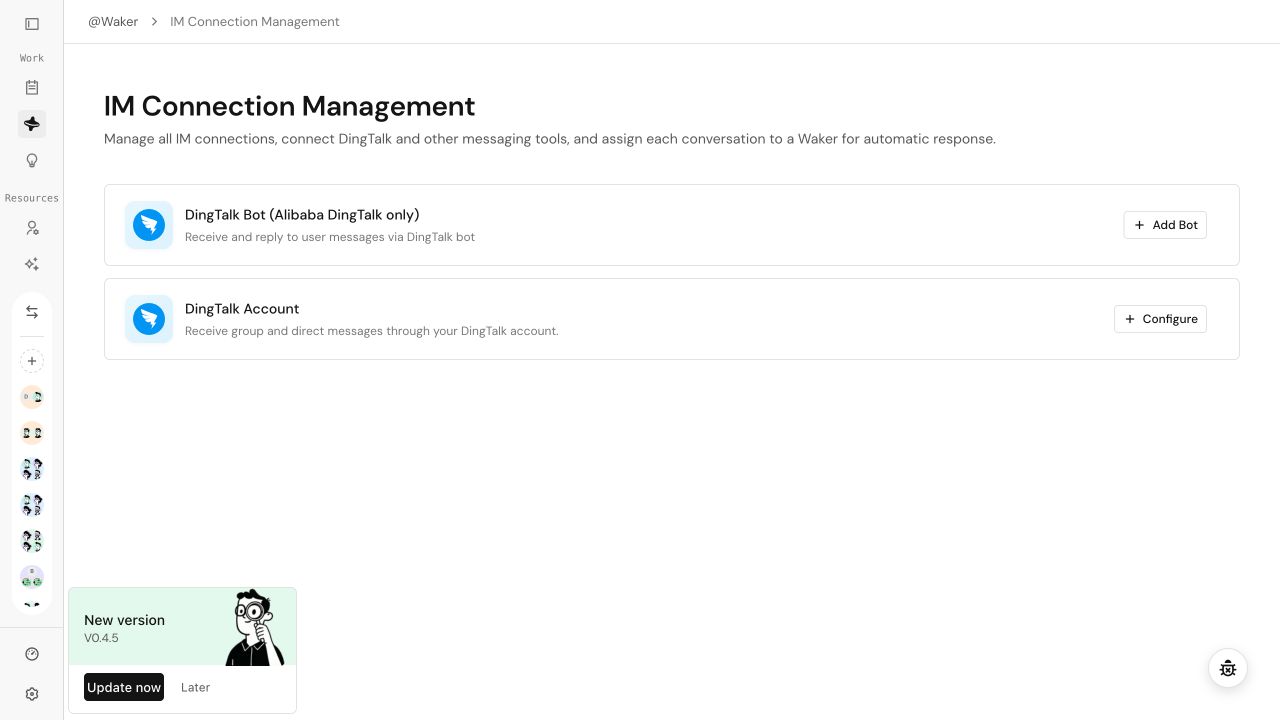
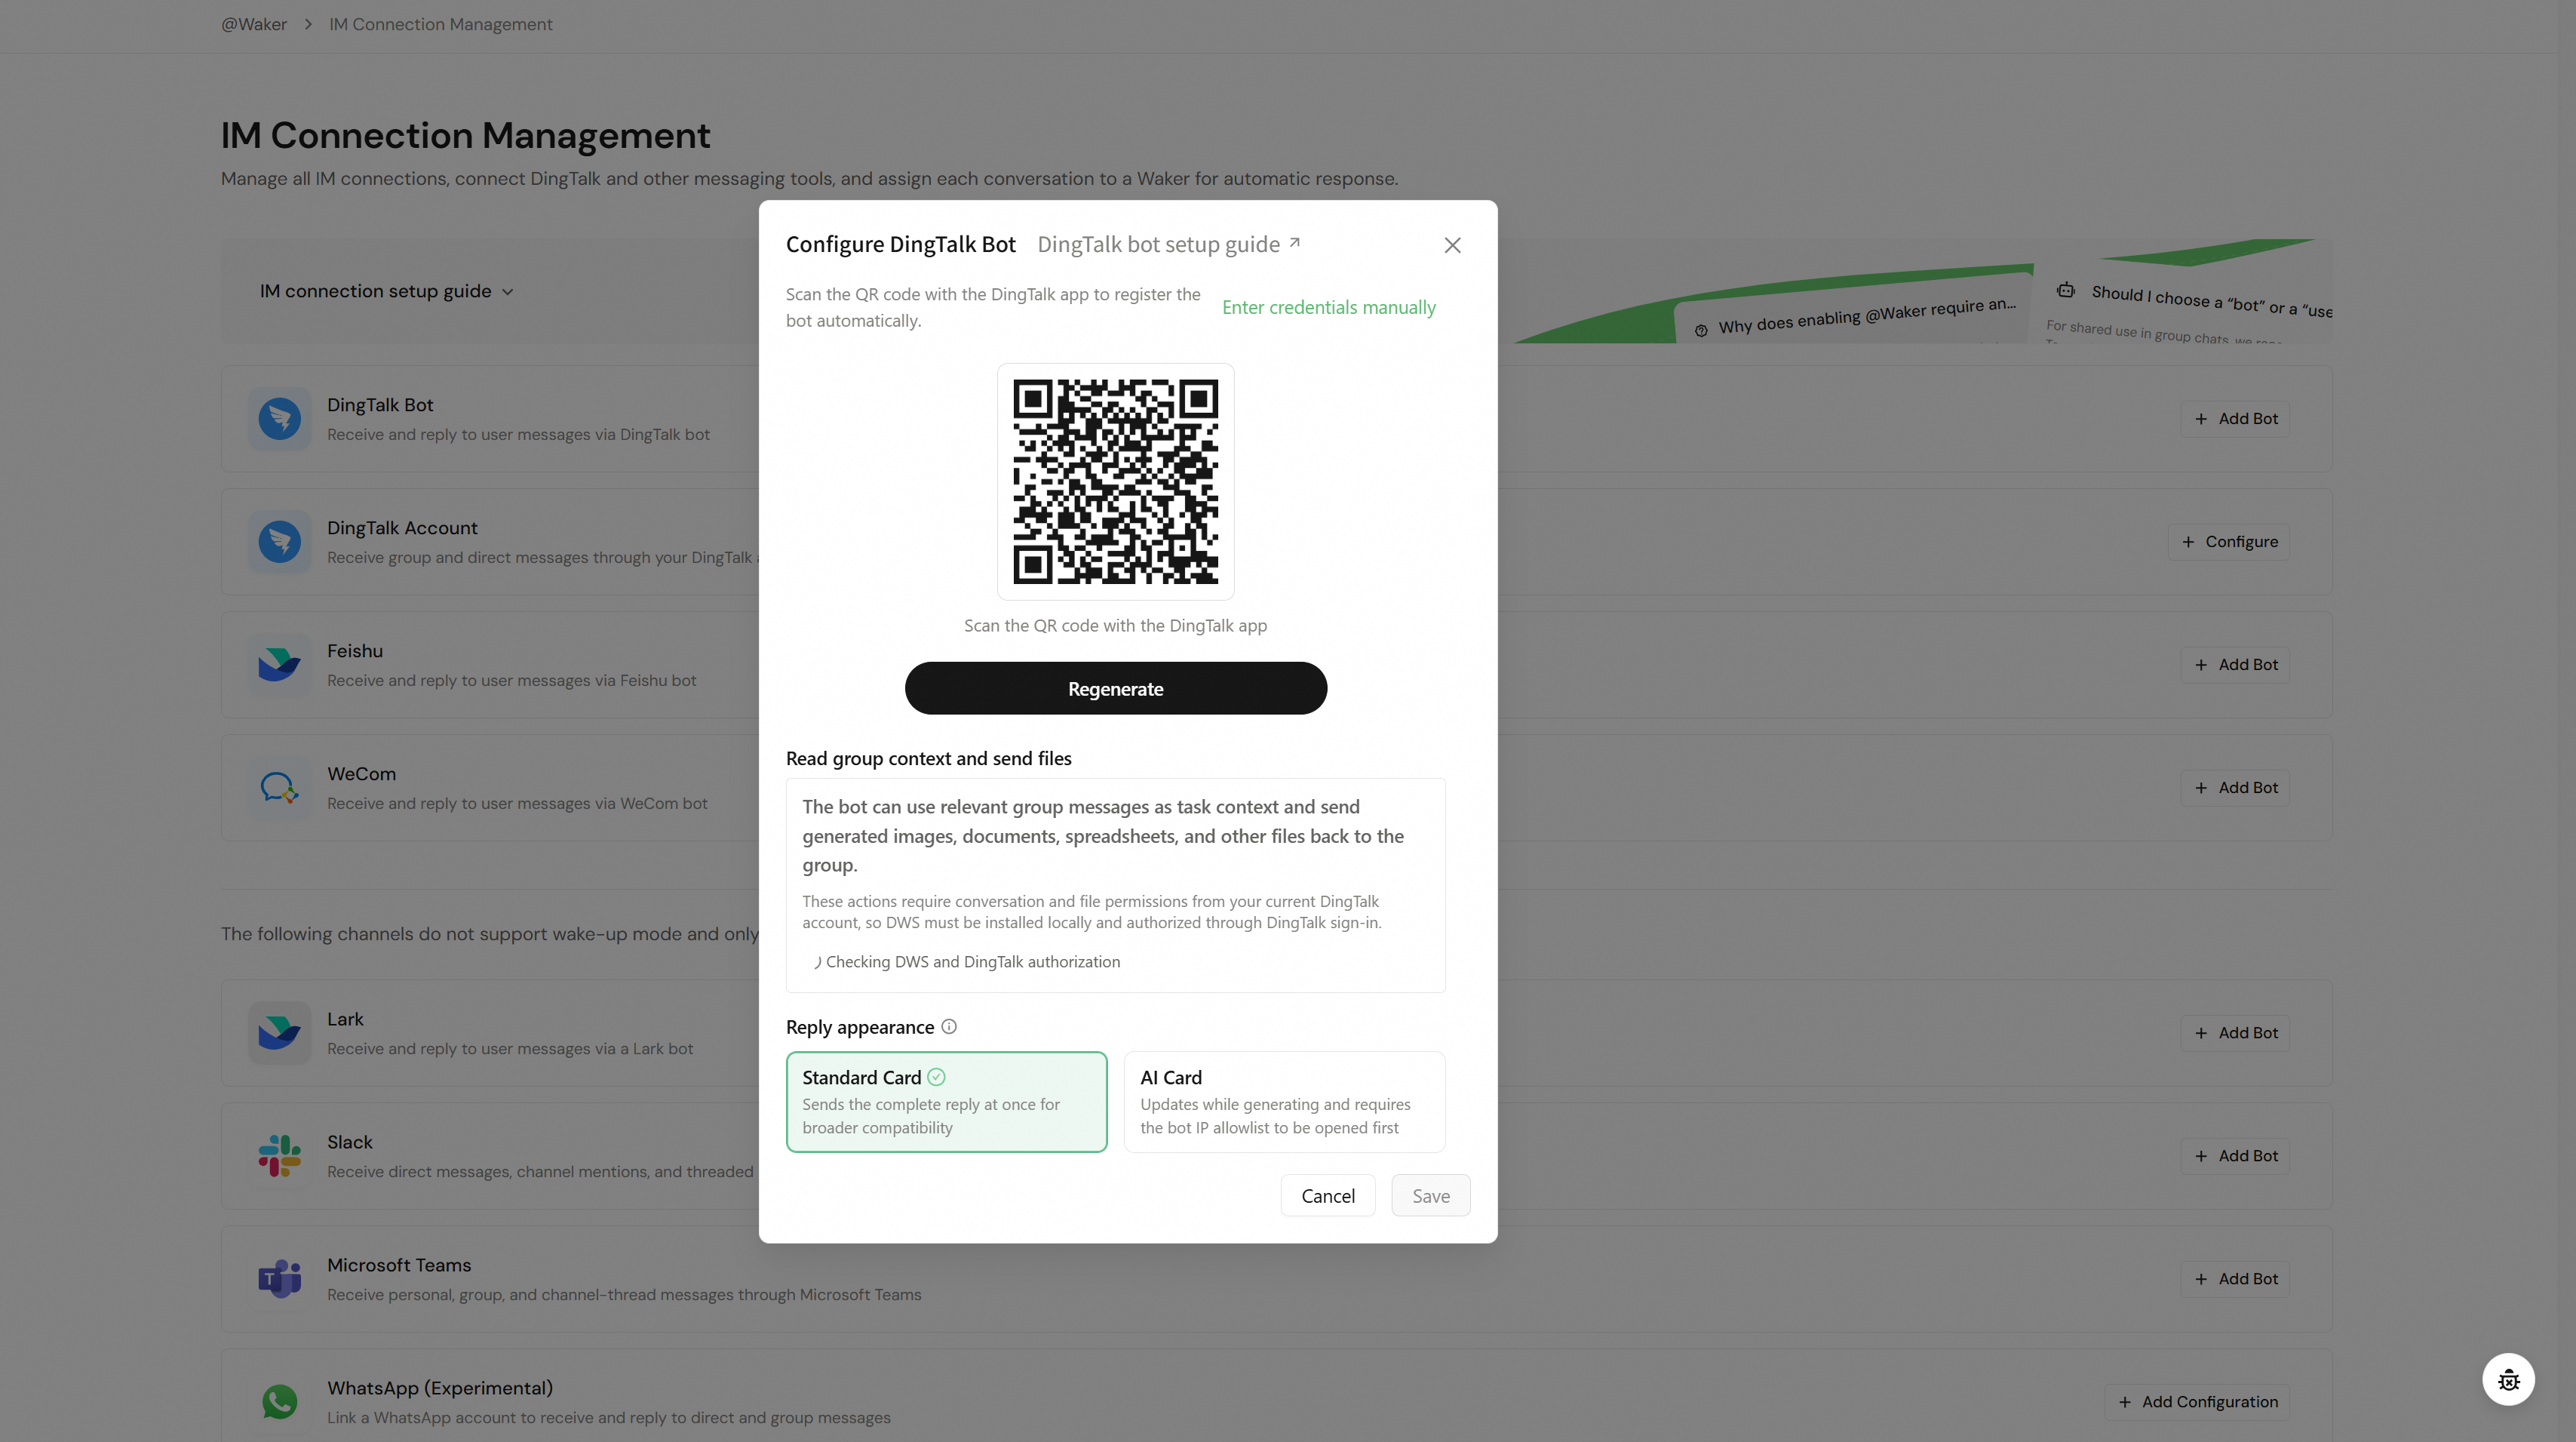 Never place credentials in Waker descriptions, knowledge, memory, task requests, or screenshots.
The full setup path is: make an IM connection available, pair a chat, configure Wakers, then turn on Wake-up Mode and validate the result. After you select Enable @Waker, the wizard moves through IM connection, chat access, and Waker configuration. If the first step reports no available IM connection, return to IM Connection Management and connect a bot or user first.
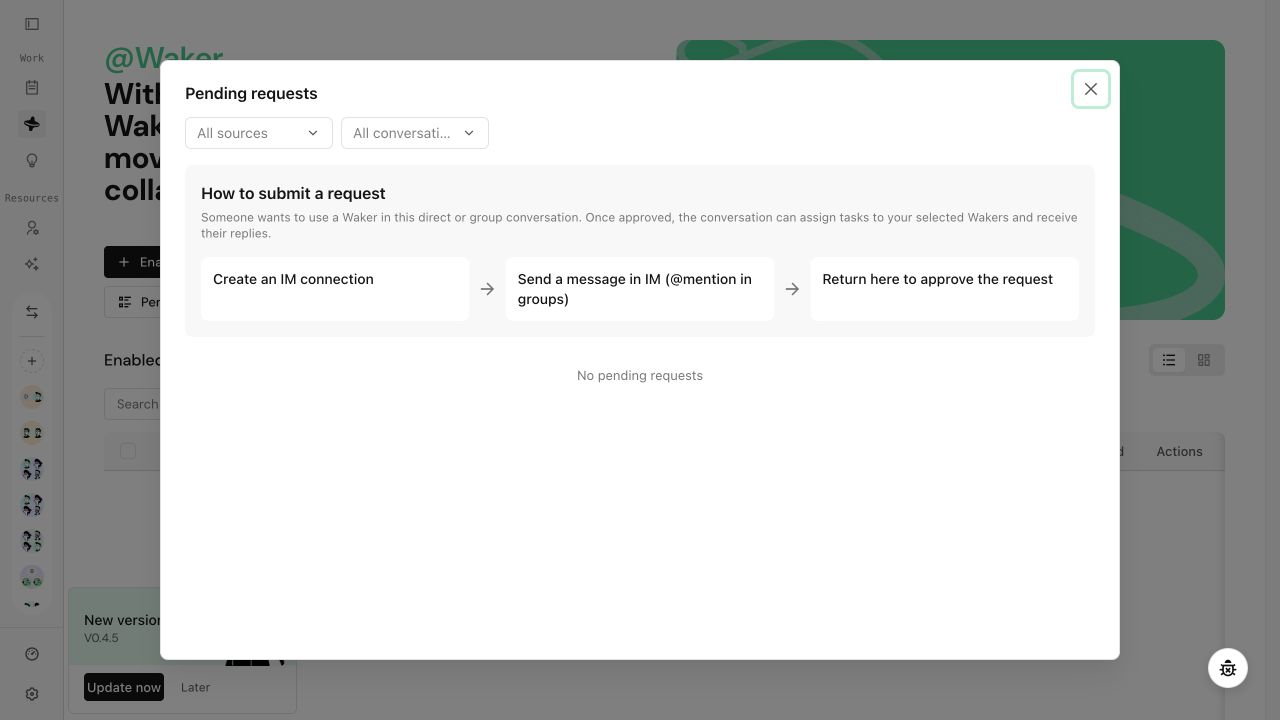
There are two primary ways to pair a chat. Search for the chat when the connection can already discover it. When the chat is not searchable, send a message in IM to create a pending request and approve that request in QoderWake. Both paths finish in the same Waker configuration.
Use this method when the administrator knows the target direct or group chat and the IM connection supports chat search.
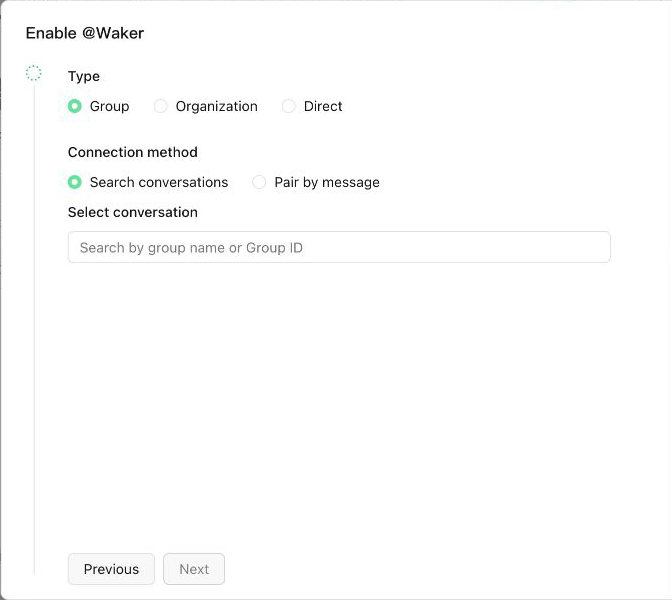
Use this method when QoderWake has not discovered the chat or the administrator cannot conveniently search for it. Sending a message creates a pending request; it does not authorize the chat automatically.
Some channels also expose a pairing code as an additional option. After you select a Waker, QoderWake generates a pairing message that is typically valid for 10 minutes. Send the complete message to the target group and mention the bot, or send it directly to the bot. Return to the @Waker list and verify the chat, Wakers, and enabled state. Do not publish or retain pairing codes unnecessarily.
The chat appears in the enabled-chat table or card view. Verify its IM connection, Wakers, default Waker, workspace, model, Wake-up Mode, and enabled state. Then send two requests in the same test chat: an obvious request that should route to a specialist and an ambiguous request that should reach the default Waker or trigger a clarification question.
Each Waker has independent settings. Review them before saving:
When IM model changes are allowed, a member can explicitly request a model that the page makes available for that task. The selection applies only to that task. If no model is specified, the name is unavailable, or policy disallows it, that Waker's default model is used. Different models consume their corresponding quota, so validate this behavior in a test chat first.
QoderWake management access is high risk. It can let a Waker create autonomous tasks or manage Wakers, Skills, and MCP resources. Permission changes, credentials, deletion, and other protected actions still require product authorization and human confirmation. Normal engineering, support, and content groups usually do not need this option.
Wake-up Mode turns a basic IM chat into an @Waker workspace for ongoing work. When it is on, @Waker recognizes member intent, routes each task to an appropriate Waker, records follow-up instructions and results, and preserves topics and memory within the chat. Members still interact with one bot and do not need to understand the routing behind it.
Leave Wake-up Mode off for simple messaging, fixed Q&A, or chats always handled by one Waker. Turn it on when the chat needs multiple Wakers, continued task execution, and reusable context.
A Group or Group Chat Q&A Specialist can be used only in standard IM mode. Before switching modes, review active tasks, Wakers, and routing rules; turning Wake-up Mode off removes multi-Waker dispatch, task history, and memory behavior from subsequent messages.
Open @Waker → enabled chat → chat details:
Filter memory by scope, member, time, or source before editing. Do not store a member preference as a group-wide rule or promote a temporary discussion directly into long-term memory. Manage personal and project memory in Memory.
The group always mentions one bot. Members do not need to know how many Wakers sit behind it; responsibilities, the default Waker, and custom routing rules select the executor.
Quote the prior result and say “continue the current task” for the same work. Say “new task” when the goal, project, or main workspace changes. Do not combine a merge, production change, and analysis request in one message.
Open Response rules in the chat details to control when group messages trigger a Waker:
Experts provide human knowledge when a Waker lacks information or needs professional judgment. They do not replace the Waker or formal approval.
Use the enabled-chat list to filter by chat, connection, model, Wake-up Mode, or status. Chat details contain Overview, Task history, Memory, Experts, and Response rules. You can also edit Wakers, the default, workspaces, and permissions, or pause, resume, and remove the chat.
Prepare Wakers
- Have at least one enabled Waker that has passed a normal chat test.
- Give multiple Wakers distinct names and responsibilities, such as project coordination, implementation, and test validation.
- Verify each Waker's project, workspace, Skills, connectors, and permissions.
- Define human-confirmation boundaries for high-impact actions.
Configure an IM connection
Path: @Waker → IM Connection Management. The page shows only connection types available to the current region, account, and release.
| Connection | Use | @Waker |
|---|---|---|
| DingTalk bot | DingTalk group and bot direct messages | Supported |
| DingTalk user | Group and direct messages under a signed-in user identity | Supported |
| Feishu bot | Feishu chats | Supported when shown |
| Other connections | Basic messaging or channel-specific features | Follow the page label |
- Add or configure a connection and enter platform credentials only in the protected form.
- Complete authorization or QR-code sign-in. For a DingTalk bot, create the bot first, set message receiving to Stream, follow the page's security-setting instructions, and enable direct-message permission when needed.
- To read group context or return documents, images, and spreadsheets, install DWS when prompted and authorize the current DingTalk account for chats and files.
- Choose the access policy. With Use after pairing, every new chat must request access and be approved; begin with a test account or group.
- Choose a reply style. A normal card is sent after generation; an AI card updates while content is generated and may require an allowlist change in the platform console.
- Save, confirm that the connection is available, and send a normal test message.
Understand the four configured objects
- IM connection: the bot or user identity that receives and sends messages. Removing it immediately stops messaging and invalidates dependent chats.
- IM chat: the direct or group chat allowed to use @Waker. Authorization is isolated per chat; adding a bot to a group does not automatically authorize every group.
- Wakers that handle chat tasks: the Wakers selected when the chat is enabled.
- Wake-up Mode: determines whether this is a plain IM connection or a full @Waker chat with task pickup, intelligent routing, task history, topics, and memory.
Enable and configure @Waker
The full setup path is: make an IM connection available, pair a chat, configure Wakers, then turn on Wake-up Mode and validate the result. After you select Enable @Waker, the wizard moves through IM connection, chat access, and Waker configuration. If the first step reports no available IM connection, return to IM Connection Management and connect a bot or user first.
There are two primary ways to pair a chat. Search for the chat when the connection can already discover it. When the chat is not searchable, send a message in IM to create a pending request and approve that request in QoderWake. Both paths finish in the same Waker configuration.
Method 1: Search for a chat and enable it directly
Use this method when the administrator knows the target direct or group chat and the IM connection supports chat search.
- On the @Waker page, select Enable @Waker, choose the IM connection that sends and receives messages, and continue.
- Choose Direct or Group, then select Search chat as the access method. Add the bot to the target group before pairing a group chat.
- Search by chat name, member name, or the ID requested by the page, then select the result. Search prerequisites vary by channel: Feishu can require user authorization, while DingTalk can require DWS to be installed and signed in.
- Select one or more Wakers and choose exactly one default Waker. The default receives unmatched requests or asks for clarification.
- For every Waker, verify the response model, workspace, file-access scope, and other permissions. Do not allow multiple Wakers to write the same file concurrently.
- Turn on Wake-up Mode, confirm that the connection, chat, and Wakers are complete in the wizard, then enable the chat.
Method 2: Send a message and approve the pairing request
Use this method when QoderWake has not discovered the chat or the administrator cannot conveniently search for it. Sending a message creates a pending request; it does not authorize the chat automatically.
- Confirm that the IM connection is available. Add the bot to a group, or open its direct chat.
- Send any message in a direct chat. In a group, mention the bot and send a message so QoderWake can identify the chat and requester.
- Return to the @Waker page and open Pending requests. Filter by source or chat type when necessary.
- Verify the chat, requester, and IM connection, then select the request to approve. Do not approve an unrecognized source.
- Select Wakers and a default Waker, verify models, workspaces, and permissions, turn on Wake-up Mode, and approve the request.
- Return to the original chat and send a validation task. Group messages still mention the same single bot.
Pairing code, when available
Some channels also expose a pairing code as an additional option. After you select a Waker, QoderWake generates a pairing message that is typically valid for 10 minutes. Send the complete message to the target group and mention the bot, or send it directly to the bot. Return to the @Waker list and verify the chat, Wakers, and enabled state. Do not publish or retain pairing codes unnecessarily.
Validate immediately after enabling
The chat appears in the enabled-chat table or card view. Verify its IM connection, Wakers, default Waker, workspace, model, Wake-up Mode, and enabled state. Then send two requests in the same test chat: an obvious request that should route to a specialist and an ambiguous request that should reach the default Waker or trigger a clarification question.
Configure advanced Waker options
Each Waker has independent settings. Review them before saving:
| Option | Recommendation |
|---|---|
| Response model | Select a stable default model; Auto follows the current recommended configuration |
| Allow model changes from IM | Off by default; enable only when members understand model capability, quota, and data boundaries |
| Workspace or project | Grant only the scope required for that role; avoid concurrent writes to the same file |
| File and tool permissions | Start read-only and minimal; keep external sends, deletion, and production writes behind approval |
| Allow QoderWake management operations | Off by default; enable only for trusted members and explicit administration scenarios |
| Default Waker | Set exactly one to handle unclear requests or ask for clarification |
What is Wake-up Mode
Wake-up Mode turns a basic IM chat into an @Waker workspace for ongoing work. When it is on, @Waker recognizes member intent, routes each task to an appropriate Waker, records follow-up instructions and results, and preserves topics and memory within the chat. Members still interact with one bot and do not need to understand the routing behind it.
Leave Wake-up Mode off for simple messaging, fixed Q&A, or chats always handled by one Waker. Turn it on when the chat needs multiple Wakers, continued task execution, and reusable context.
| Capability | Wake-up Mode on | Wake-up Mode off |
|---|---|---|
| Behavior | @Waker picks up and intelligently dispatches work | Plain IM chat connection |
| Wakers | Multiple Wakers, a default, and routing rules | One Waker only; reduce to one before turning the mode off |
| Task context | Task history and every continuation are recorded | No @Waker task orchestration |
| Topics and memory | Chat, member, and topic memory accumulate | No @Waker topic or memory accumulation |
| Best for | Ongoing engineering, incident, and operations work | Simple messaging with one fixed Waker |
Work in IM
- Group: mention the single bot and state the task. Routing uses names, responsibilities, the default Waker, and routing rules. Task status identifies the Waker doing the work.
- Direct message: send a task directly. Continue the same task with follow-up messages, or state clearly when a new task or workspace is required.
- Continue work: reference the previous result and provide new constraints or acceptance criteria.
- Files: delivery depends on channel capabilities. Use the returned link or the task artifact in QoderWake when native attachments are unavailable.
Inspect tasks, topics, and memory
Open @Waker → enabled chat → chat details:
| Content | Scope | Appropriate use |
|---|---|---|
| Group shared memory | Everyone in the current group | Team conventions, stable facts, and confirmed decisions |
| Member memory | One member in the current group | Role, preferences, and collaboration habits |
| Direct-chat memory | The member's bot chat | Long-term context that belongs only to that direct chat |
| Topic | One discussion in a group or direct chat | Task summaries, stage conclusions, and follow-up context |
Write a group request
The group always mentions one bot. Members do not need to know how many Wakers sit behind it; responsibilities, the default Waker, and custom routing rules select the executor.
Configure response rules
Open Response rules in the chat details to control when group messages trigger a Waker:
- @ response: the default rule. Mentioning the bot triggers a response; when off, only custom rules are evaluated.
- Message rule: match a sender, keyword, or regular expression without an @ mention; add a cooldown and appended instruction when needed.
- Schedule rule: initiate work hourly, daily, weekly, monthly, or with a custom five-field Cron expression.
Configure experts
Experts provide human knowledge when a Waker lacks information or needs professional judgment. They do not replace the Waker or formal approval.
- Open the Waker used by @Waker and enter its expert configuration.
- Add expert identities, specialties, and available channels.
- Define when to ask for help, what context to include, and how to continue after a response.
- Trigger one test consultation and verify that the answer returns to the original task.
Manage and validate
Use the enabled-chat list to filter by chat, connection, model, Wake-up Mode, or status. Chat details contain Overview, Task history, Memory, Experts, and Response rules. You can also edit Wakers, the default, workspaces, and permissions, or pause, resume, and remove the chat.
- Pause a chat: stop new tasks while retaining configuration and history.
- Turn Wake-up Mode off: return to standard IM mode after reducing Wakers to one.
- Remove a chat: unpair @Waker without deleting the IM group itself.
- Remove an IM connection: immediately stop messaging. Re-adding the same bot restores prior chats as paused, and they must be resumed manually.