

By default, QoderWork works within conversations and local files. But real work spans browsers, calendars, email, enterprise chat, and more. Connectors bridge that gap — once enabled, QoderWork can operate Chrome, interact with macOS native apps, reach Microsoft 365, and (for organizations on DingTalk) drive workplace workflows through natural language.
Without connectors, QoderWork is limited to conversations and local files; with them, it spans applications and systems to help you complete your work. QoderWork provides various ways to integrate with external systems, and all connectors are unified and managed under the left sidebar under Extensions → Connectors. They are primarily divided into two categories:
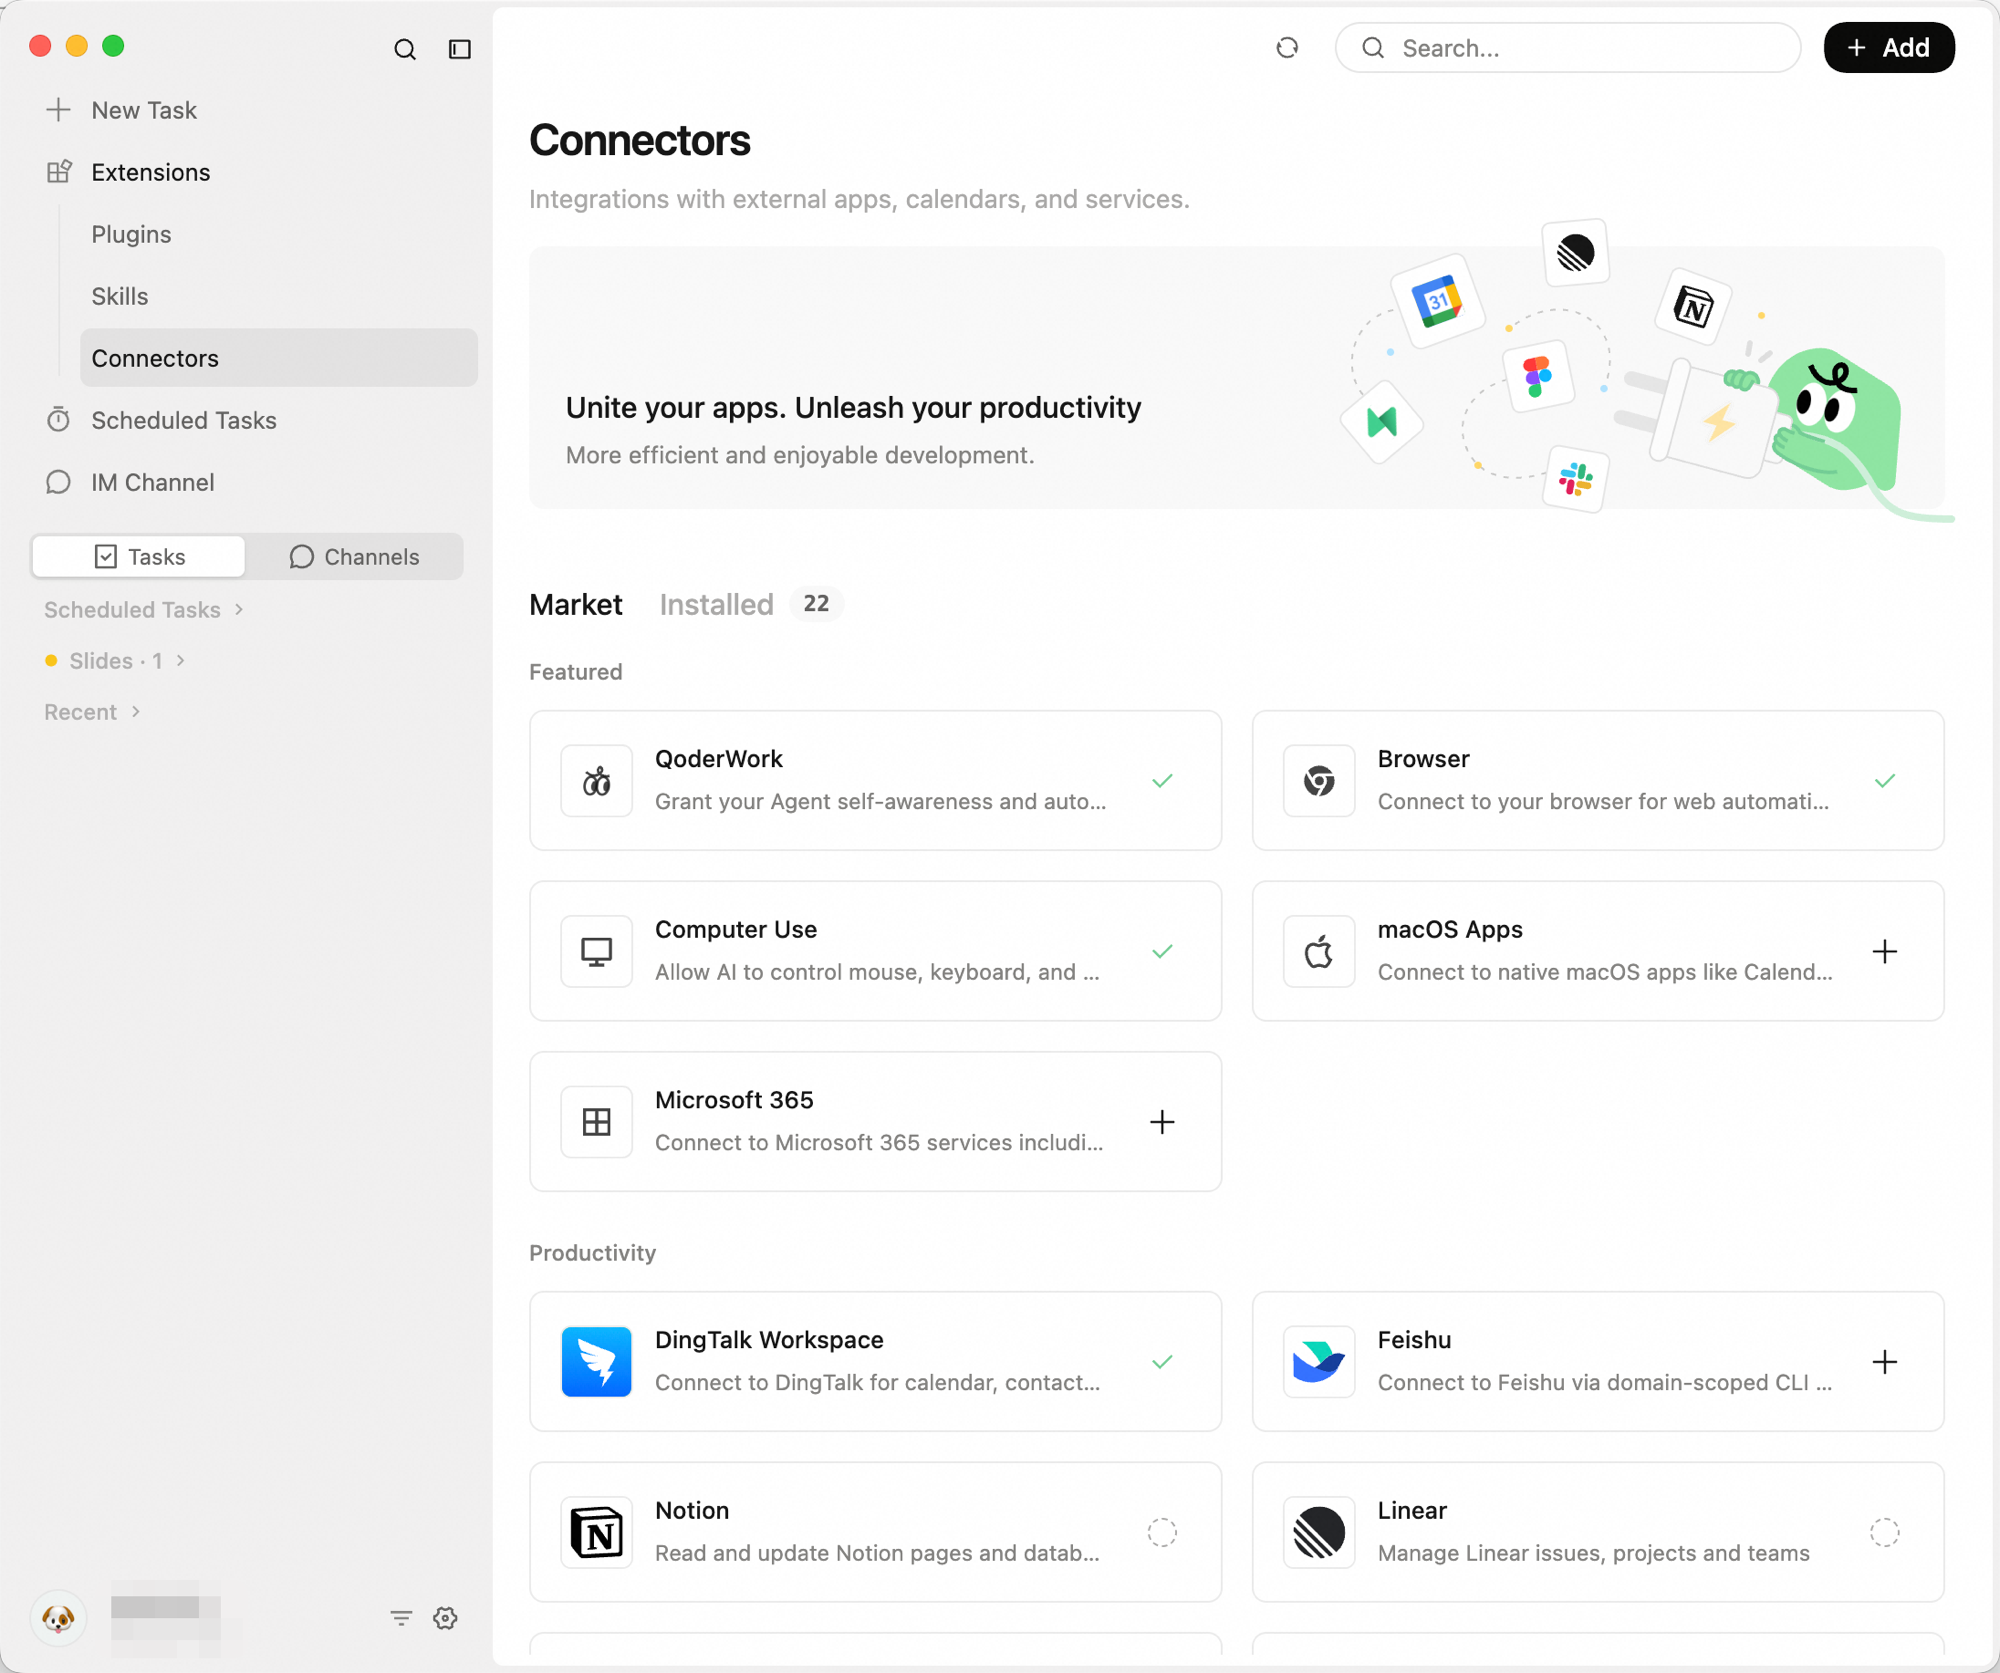
Explore and install integrations for enterprise collaboration platforms and third-party SaaS tools directly from the in-app market. The Productivity section includes: DingTalk, Feishu, Notion, Linear, Todoist, Canva, Supabase, Vercel, Neon, Slack, Figma, Google Calendar, Google Maps, LINE, and more. You can also manually add custom MCP servers here.
All integrations remain inactive by default. QoderWork will not access external data until you explicitly enable and authorize a connector.
The browser connector gives QoderWork control of your browser — navigating pages, clicking buttons, extracting data, and filling forms. Supports Chrome, Edge, and other Chromium-based browsers.
A lot of day-to-day work involves repetitive browser tasks: exporting data from a dashboard, checking competitor pricing, copying information across tabs. None of it is hard, but it's time-consuming and error-prone. The browser connector lets you describe what you need in plain language and the AI handles the rest.
Data collection and research
Web scraping
Industry news gathering
Bulk form filling
The macOS connector lets QoderWork read and write data in your Mac's built-in apps — turning Calendar, Mail, Reminders, and more into an AI-accessible workspace.
Find the macOS connector under the left sidebar under Extensions → Connectors and enable each app individually:
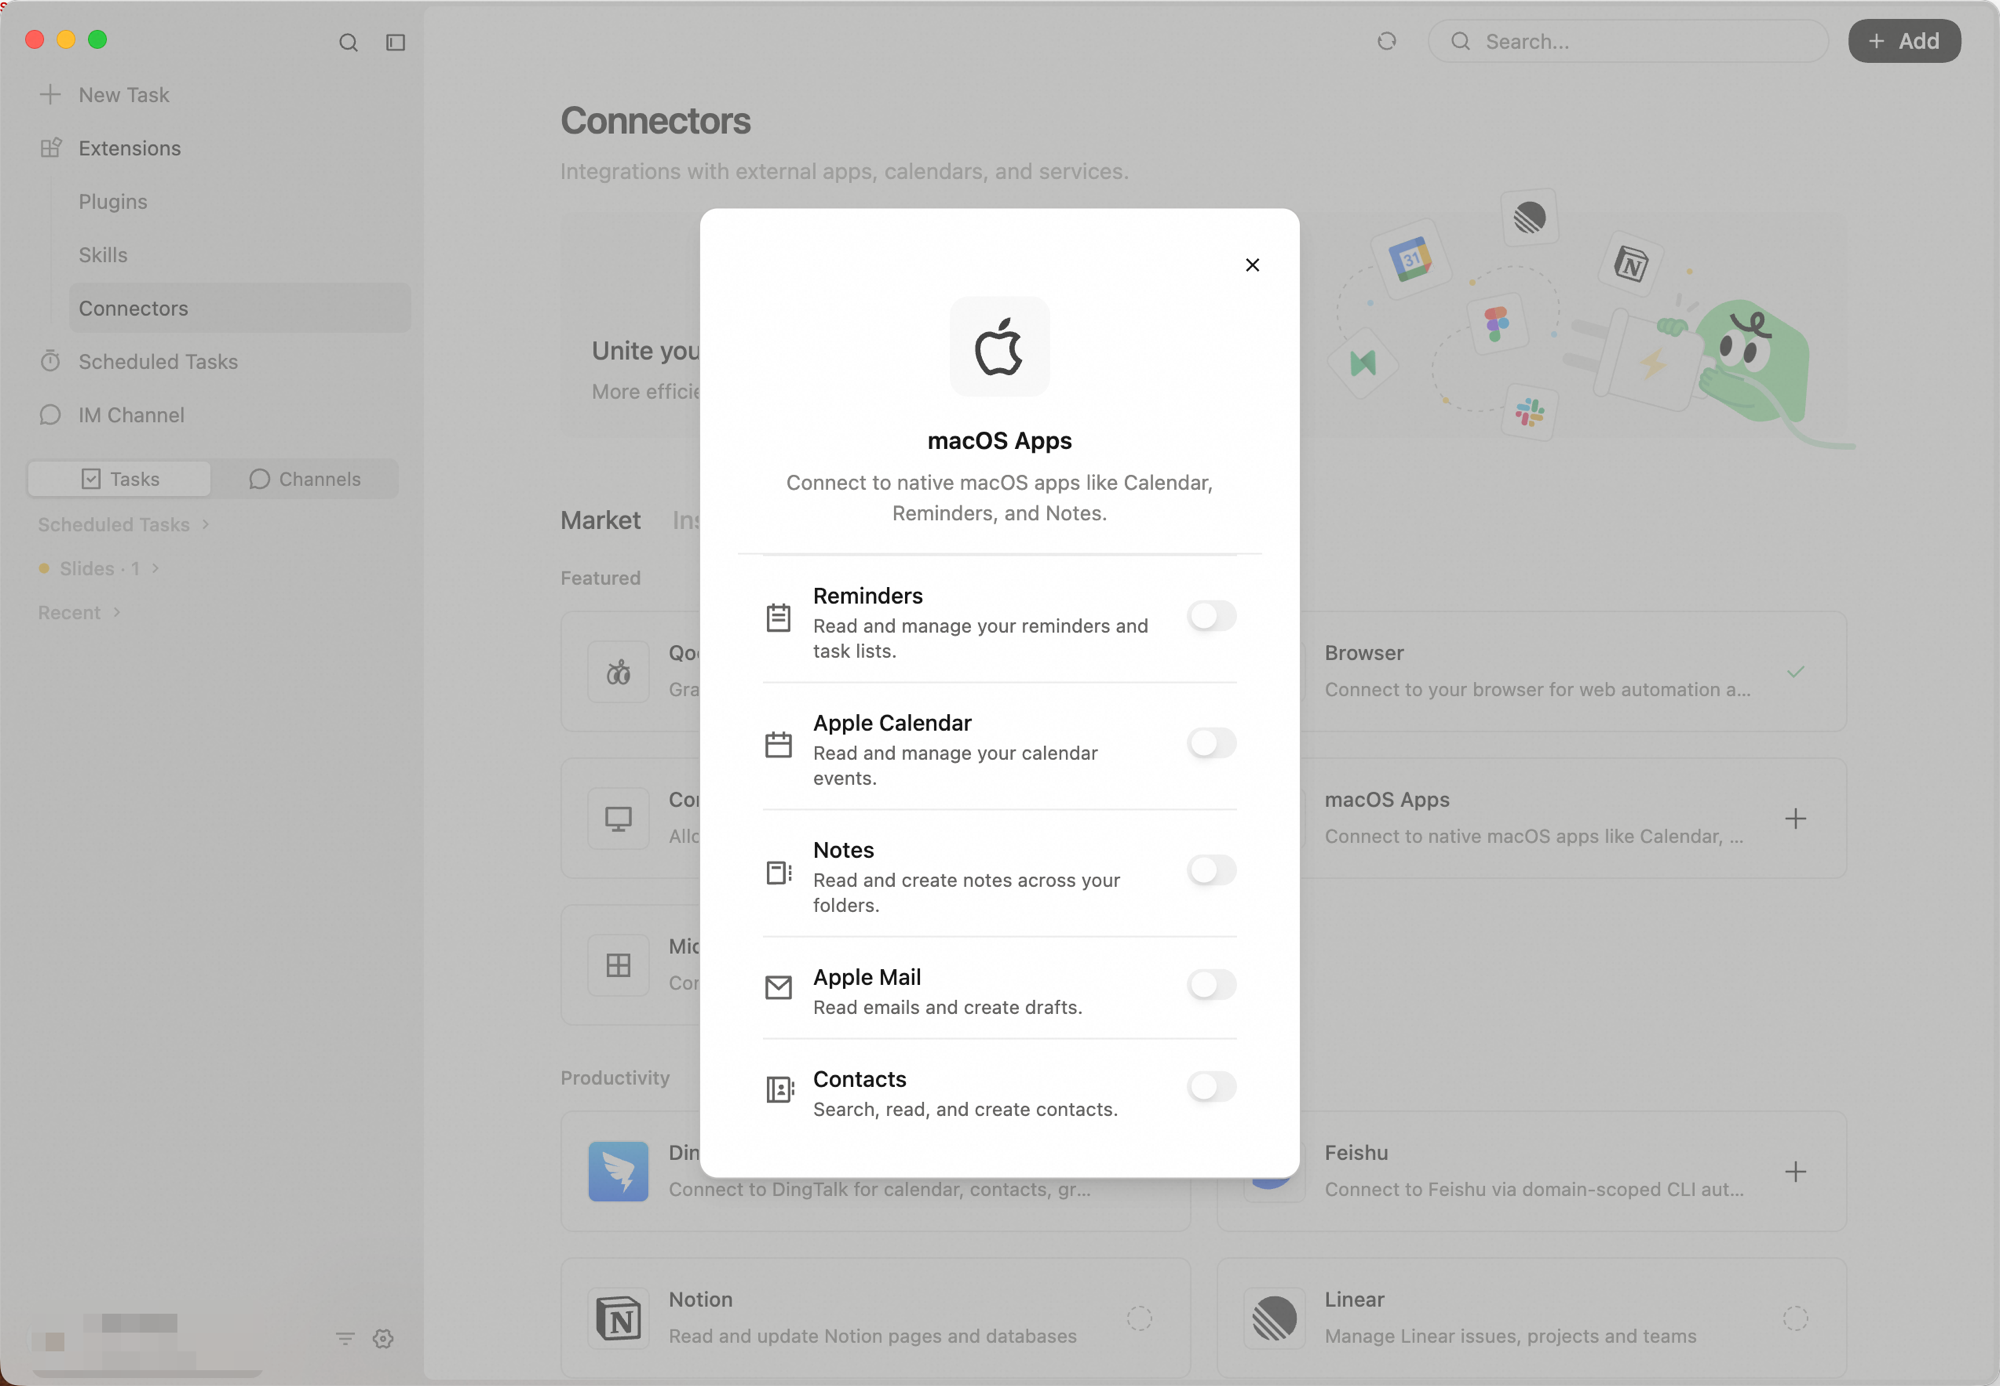
Mail
Quick schedule management
Email summary
Cross-app lookup
The Microsoft 365 connector lets QoderWork securely access your Microsoft account, bringing your cross-platform work into the AI's reach. Once connected, QoderWork can triage your Outlook inbox, manage your schedule, track your To Do lists, and interact with your OneDrive files.
Before using it, you'll need to authorize your account:
Once connected, you can enable each service individually under the Microsoft 365 settings:
Mail
Inbox and schedule triage
Context-aware task planning
DingTalk links QoderWork to your organization’s DingTalk tenant. Instead of clicking through stacked menus, you describe what you need in plain language—create to-dos, submit or draft daily reports, and work with attendance and calendar flows your tenant exposes to the app.
Routinely handling tasks in DingTalk often requires tedious navigation: finding the right app in the workbench, clicking into forms, filling out details, and submitting. This connector allows QoderWork to interface directly with DingTalk (DWS), condensing these multi-page, multi-step operations into a single natural language instruction so you can stay in your current context.
Depending on what your administrator enables, the connector uses LLMs to operate across more than ten DingTalk modules. Typical capabilities include:
Once setup finishes, use natural language for to-dos, daily reports, attendance, schedules, approvals, and other modules your administrator allows.
Create a DingTalk to-do
Draft a daily report
MCP (Model Context Protocol) is an open standard that lets AI applications plug into external tools and data sources through a unified interface. Think of it as USB-C for AI — just as USB lets any peripheral work out of the box, MCP gives AI a single way to talk to any external service.
Out of the box, QoderWork can only work with what's in your conversation. Add MCP, and it can manage your calendar, search your docs, pull live data, and much more — turning it from a chatbot into an assistant that actually gets things done.
MCP follows a client-server model:
Open the QoderWork desktop app and go to the left sidebar under Extensions → Connectors. Click + Add in the top-right — you'll see two options.
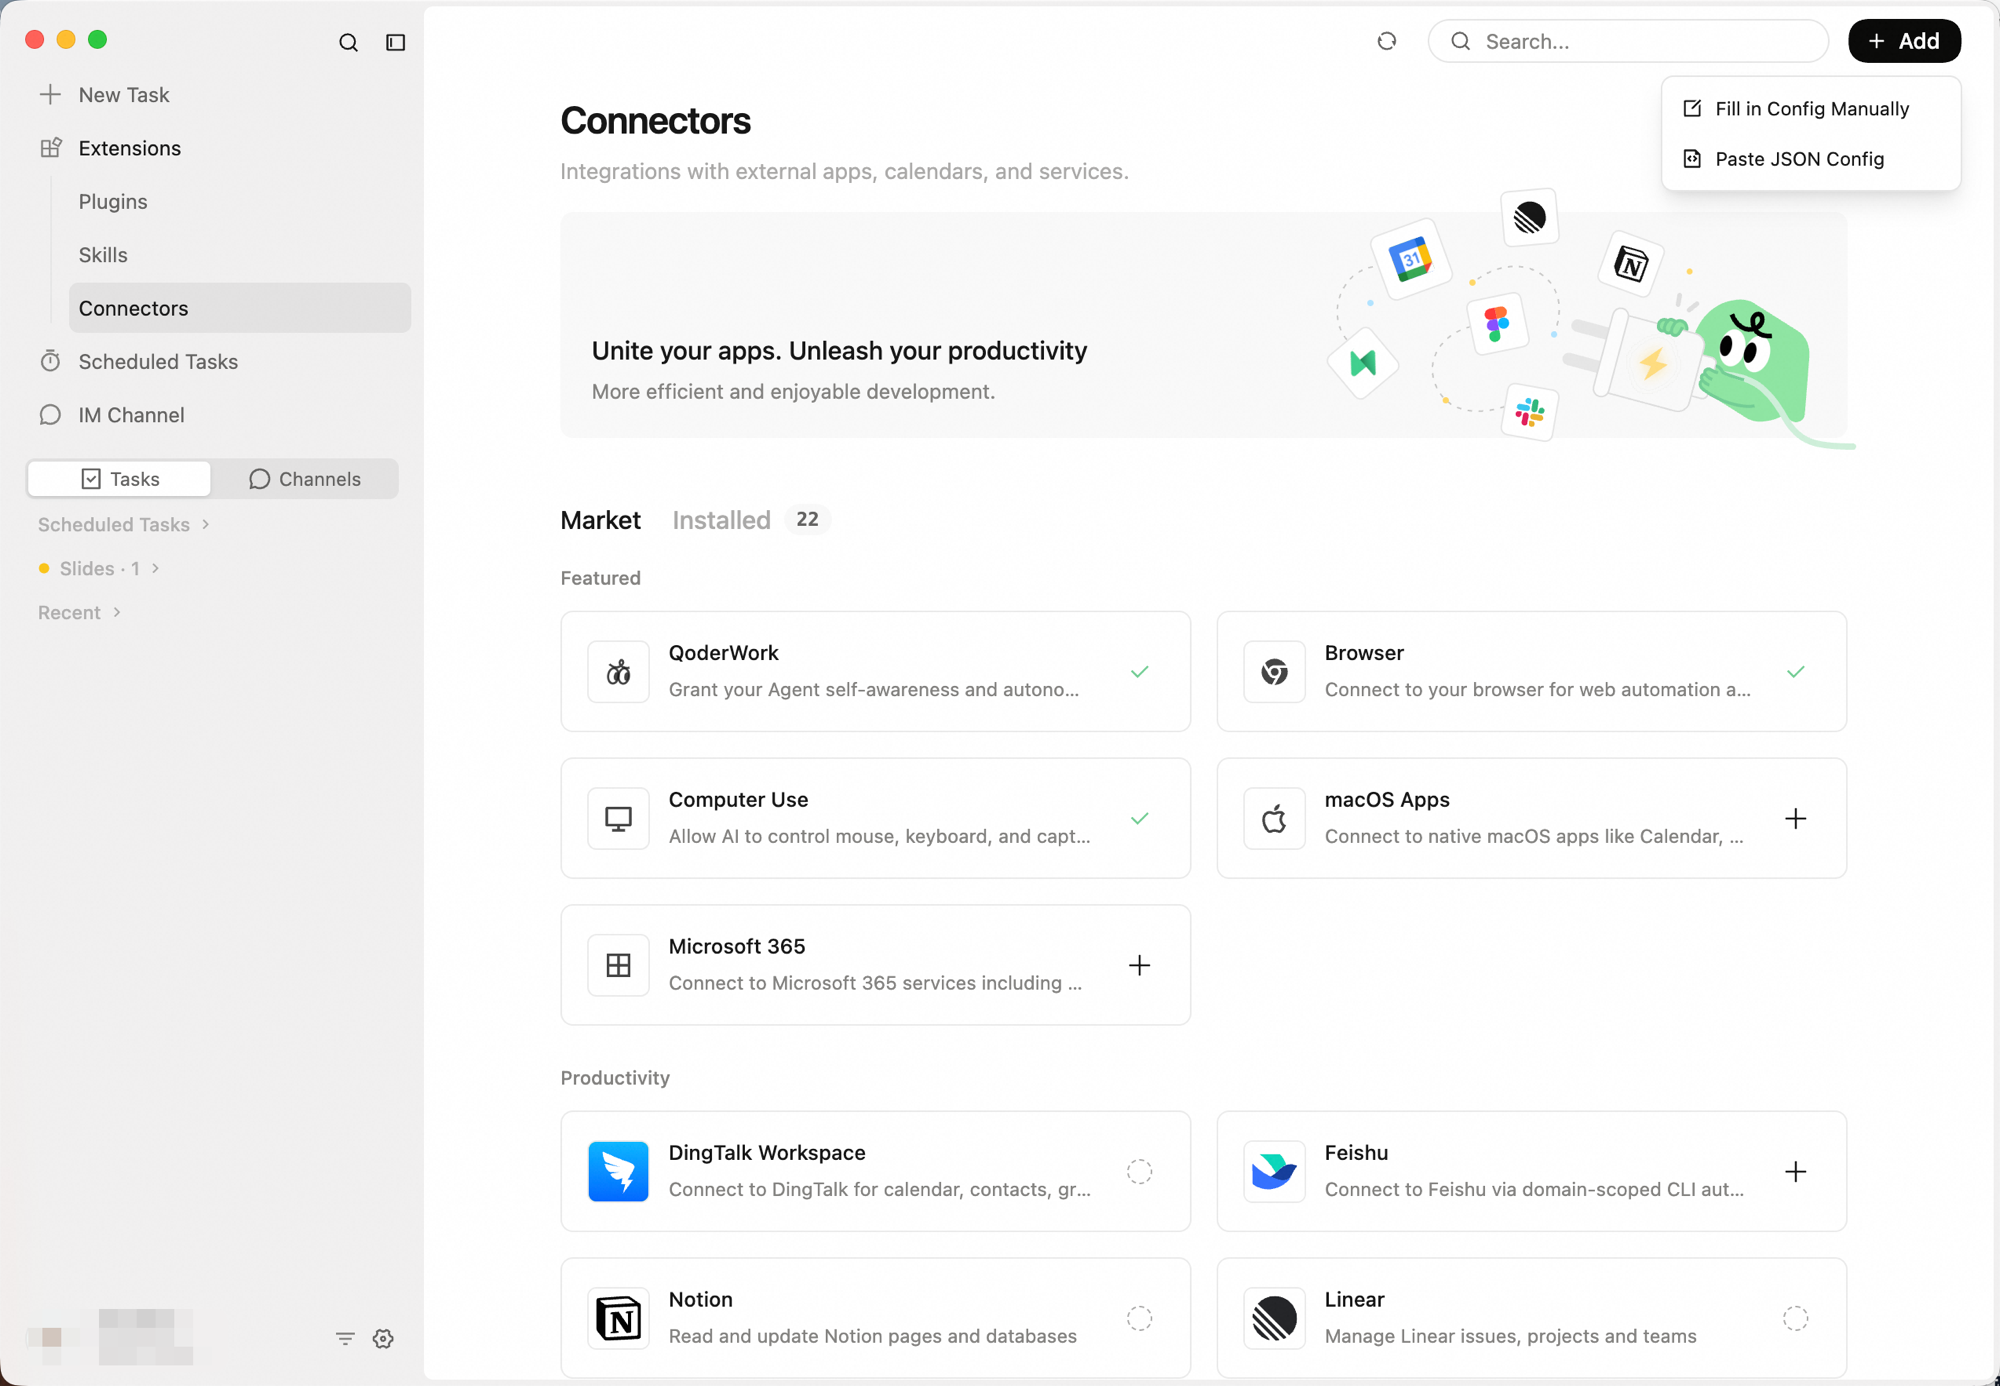
The fastest path if you already have a JSON config from an MCP marketplace or provider. Click + Add → Paste JSON Config — the Import from JSON dialog opens. Paste your config and click Import.
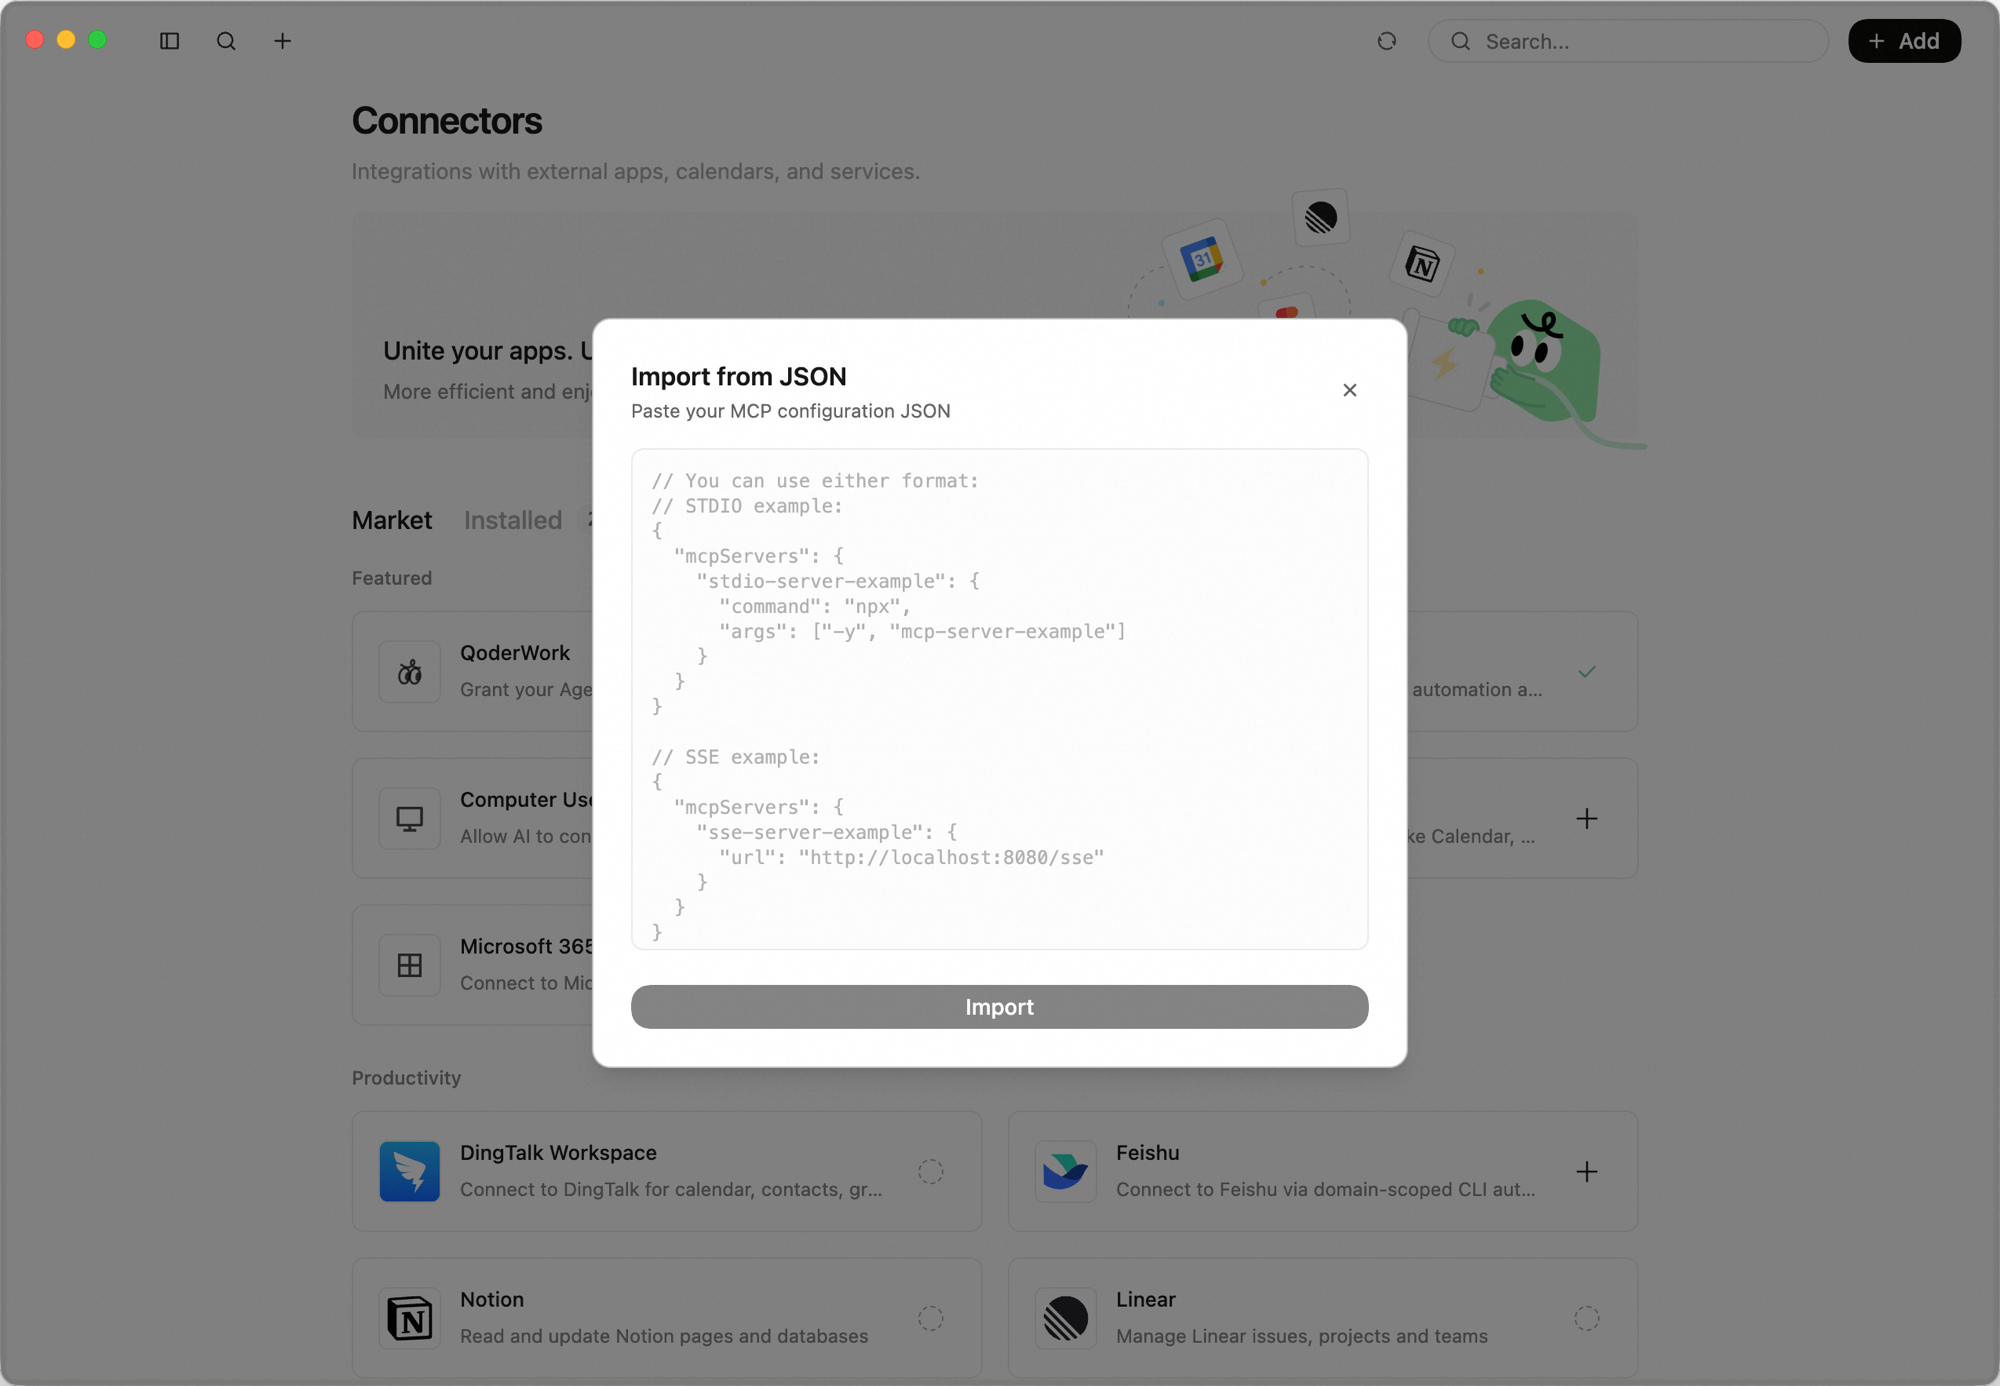 A typical config looks like this:
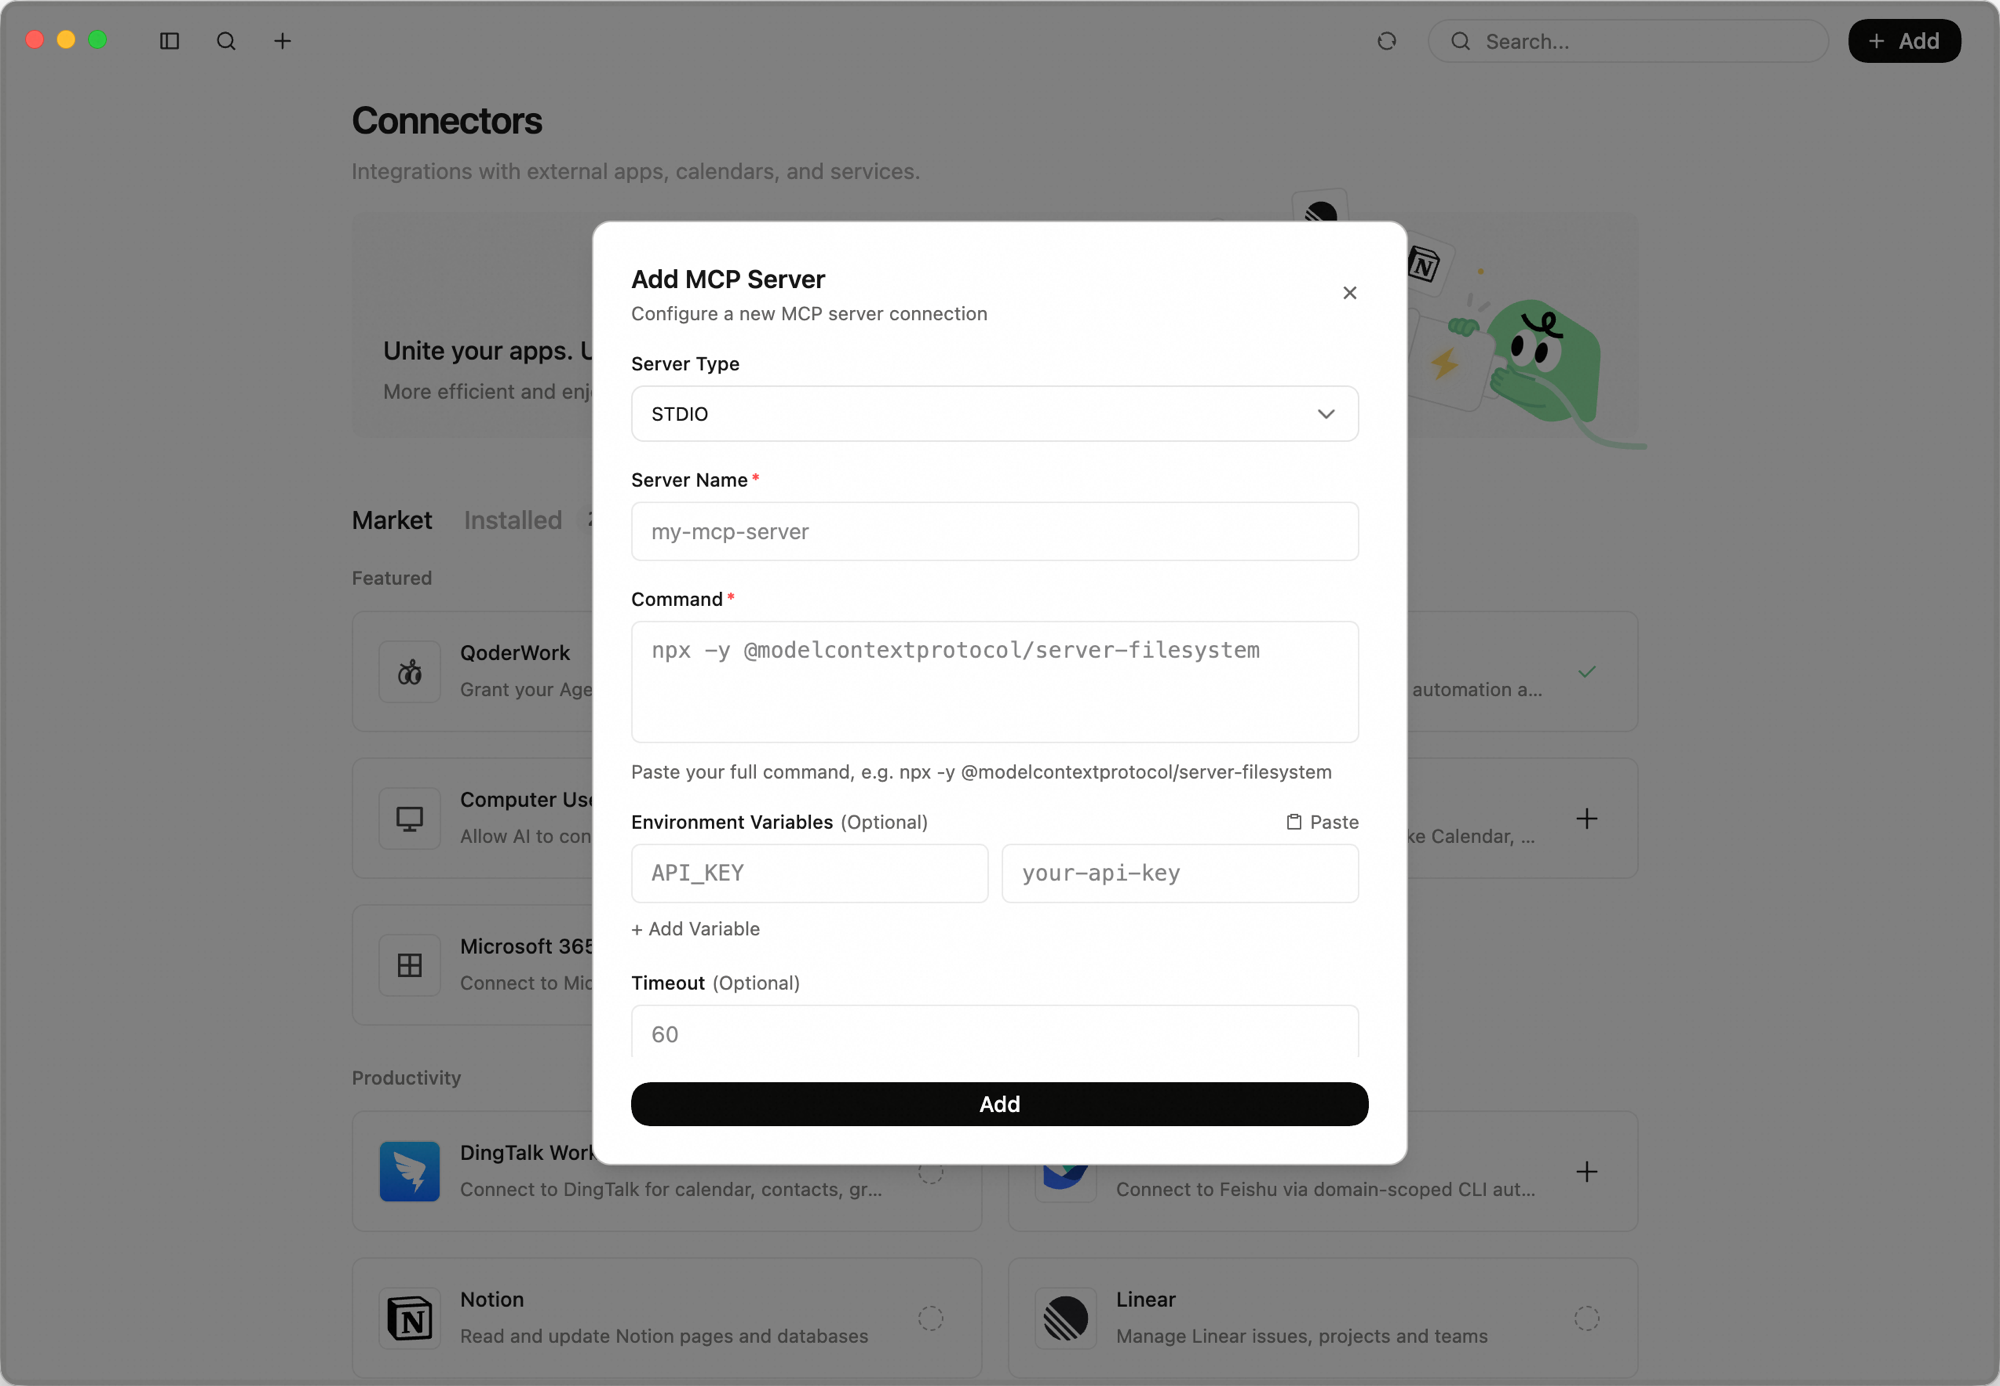
Prefer filling things in yourself? Click + Add → Fill in Config Manually. In the Add MCP Server dialog that appears, start by selecting a Server Type from the dropdown. Each type shows a different set of fields:
Open the Connectors page and switch to the Installed tab. Your added MCP servers appear under Custom. From here you can:
When multiple connectors are enabled, QoderWork can work across apps in a single task:
Browser + Calendar
Browser + Mail
Everything together
When using the browser connector, give a direct URL in your prompt rather than asking the AI to find the site. "Open https://analytics.google.com" beats "find Google Analytics" every time.
Connectors pair naturally with QoderWork's local file capabilities. Scrape data from a website and save it as a local Excel file, or read a local spreadsheet and fill out a web form — data flows freely between browser, native apps, and your filesystem.
For multi-step workflows involving page navigation or app switching, walk through the flow once in a regular conversation. Once it works, save the prompt as a Skill or scheduled task so you can reuse it.
CAPTCHAs, QR-code logins, and two-factor prompts are things the AI can't handle alone. When it hits one, step in and complete the verification — the AI picks up right where it left off once you're through.
Connectors
Without connectors, QoderWork is limited to conversations and local files; with them, it spans applications and systems to help you complete your work. QoderWork provides various ways to integrate with external systems, and all connectors are unified and managed under the left sidebar under Extensions → Connectors. They are primarily divided into two categories:
Built-in Connectors
- Browser: Controls the browser to navigate pages, extract data, and fill forms automatically.
- macOS Apps: Reads and writes data to native Calendar, Reminders, Notes, Mail, and Contacts apps.
- Microsoft 365: Interacts with Outlook Mail, Calendar, To Do, Contacts, OneNote, and OneDrive.
Integration Market
Explore and install integrations for enterprise collaboration platforms and third-party SaaS tools directly from the in-app market. The Productivity section includes: DingTalk, Feishu, Notion, Linear, Todoist, Canva, Supabase, Vercel, Neon, Slack, Figma, Google Calendar, Google Maps, LINE, and more. You can also manually add custom MCP servers here.
All integrations remain inactive by default. QoderWork will not access external data until you explicitly enable and authorize a connector.
Browser
The browser connector gives QoderWork control of your browser — navigating pages, clicking buttons, extracting data, and filling forms. Supports Chrome, Edge, and other Chromium-based browsers.
The browser connector currently supports only Chromium-based browsers (such as Chrome and Edge). Safari and Firefox are not supported yet.
Why you'd want this
A lot of day-to-day work involves repetitive browser tasks: exporting data from a dashboard, checking competitor pricing, copying information across tabs. None of it is hard, but it's time-consuming and error-prone. The browser connector lets you describe what you need in plain language and the AI handles the rest.
Core capabilities
- Shares your login sessions — runs in your logged-in browser, no extra credentials needed.
- Driven by natural language — no scraping code or recorded scripts, just describe what you want.
- Sees and interacts with pages — the AI understands page structure (buttons, forms, lists) and can click, type, scroll, and select.
- Extracts and organizes data — pulls structured data from web pages and outputs it as spreadsheets, Markdown, or files.
- Multi-tab support — works across multiple tabs, switching and comparing data between pages.
Setup
1
Install the browser extension
In the left sidebar, click Extensions → Connectors. Find Browser in the Featured list and click +. The dialog opens with status Waiting for Extension — click Install from Chrome Web Store to complete the installation. If you run into issues, click "Having trouble installing from the store? Try manual install."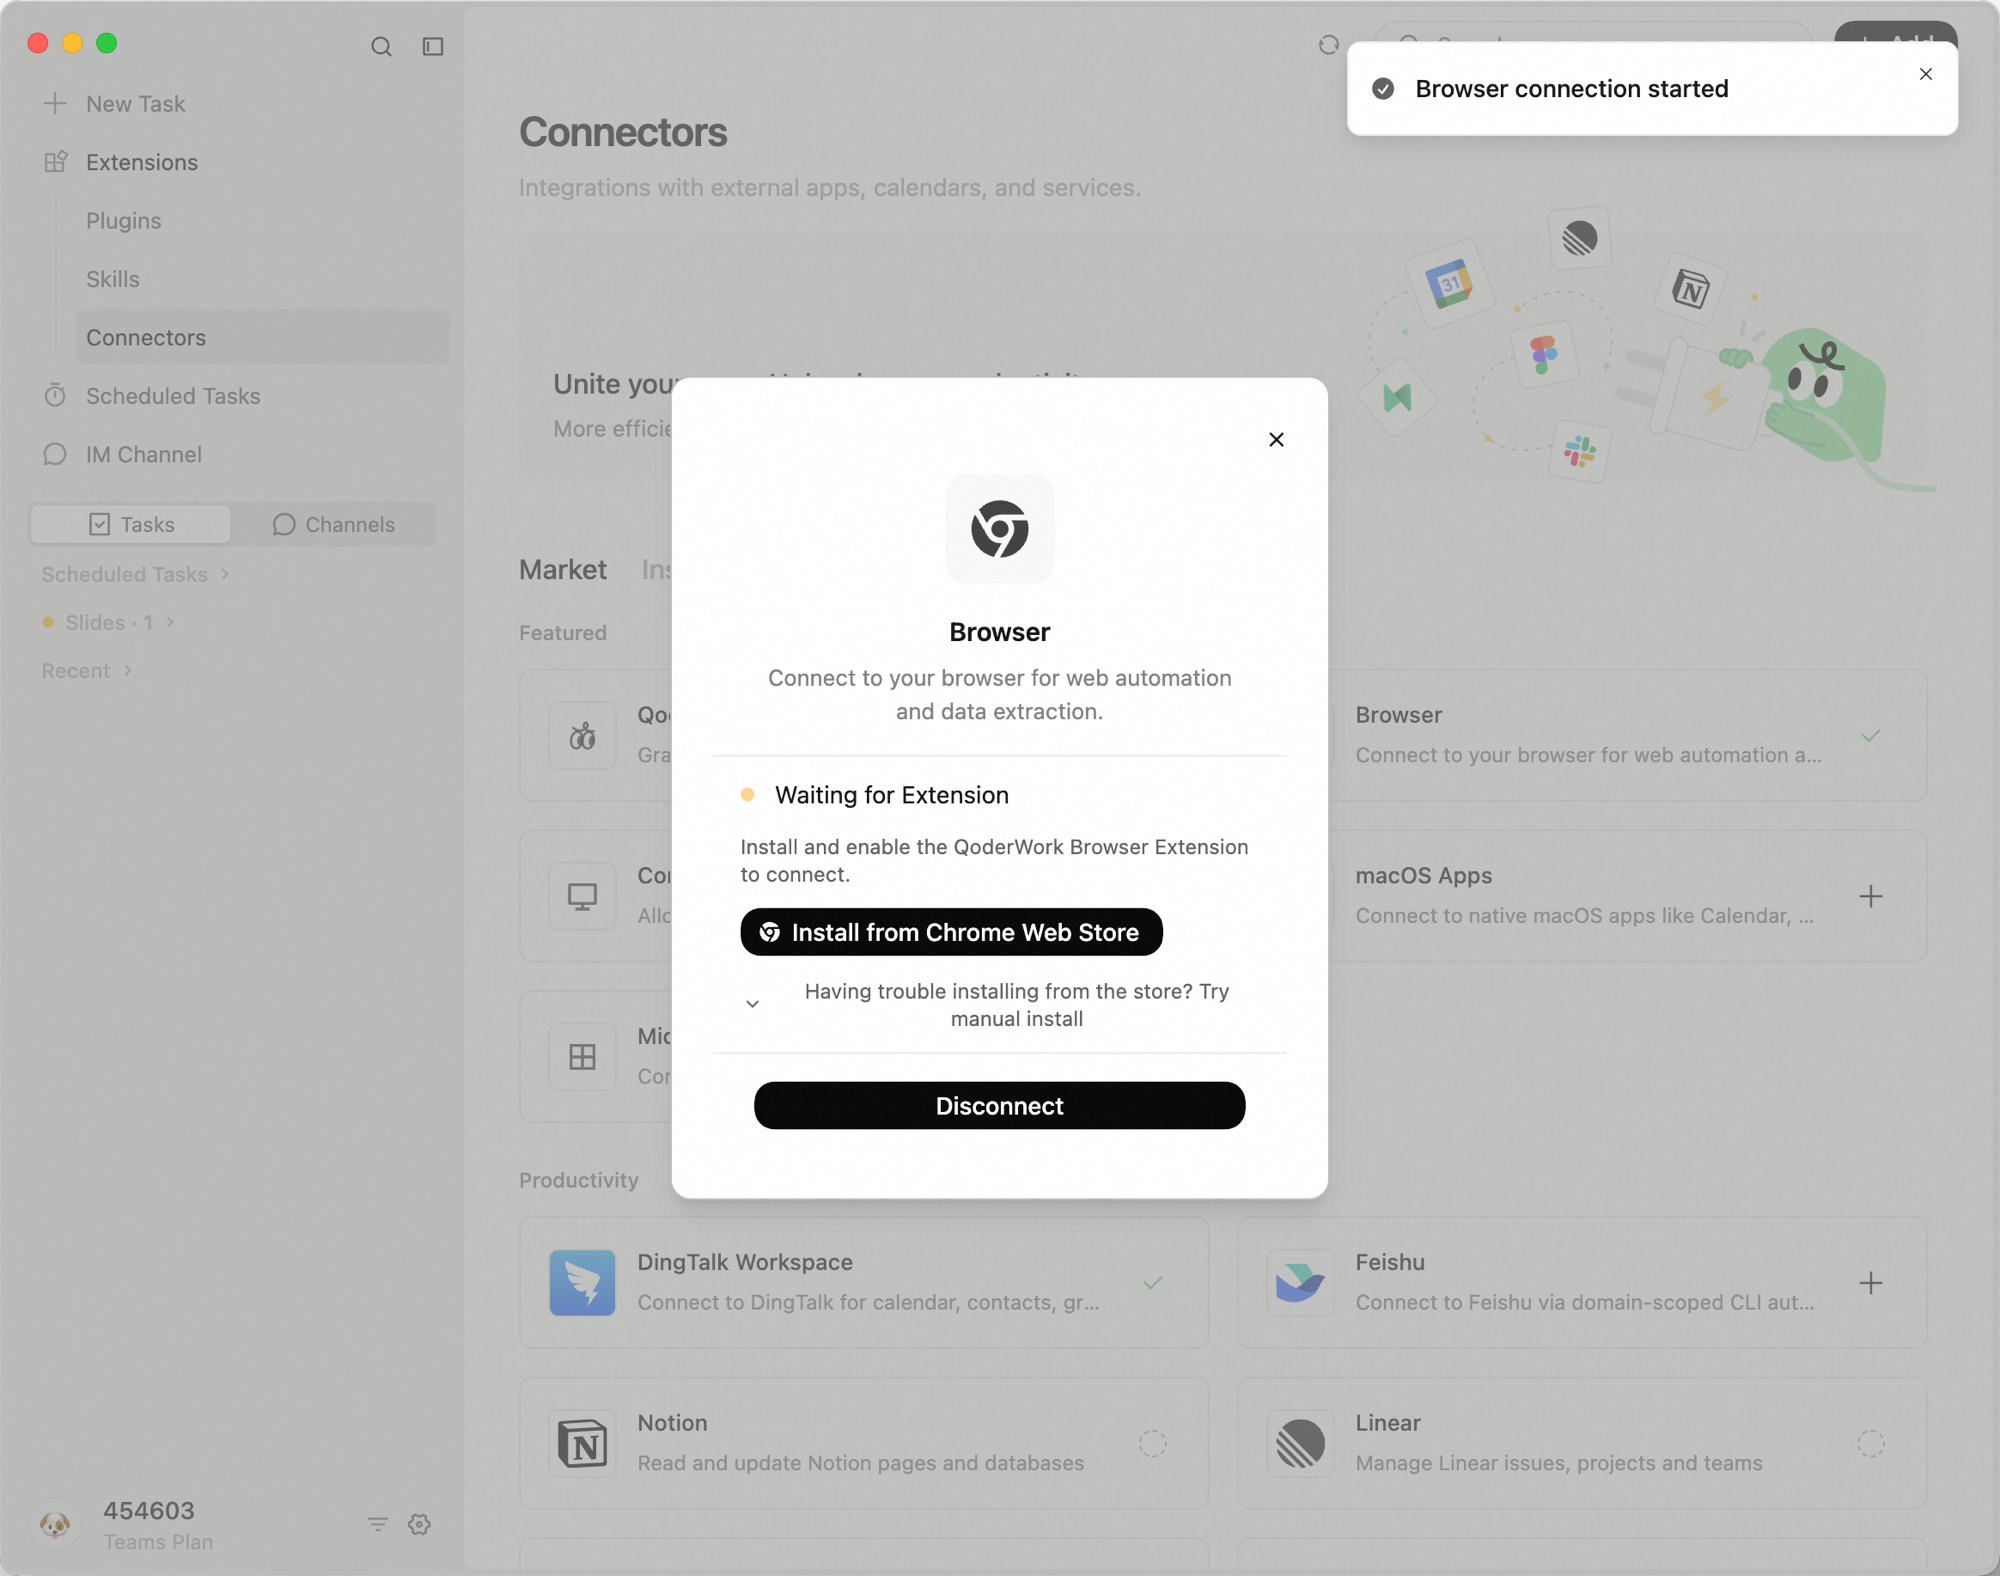
2
Confirm the connection
Once installed and enabled, the dialog status changes to Extension Connected, showing the connected browser instance — you're all set.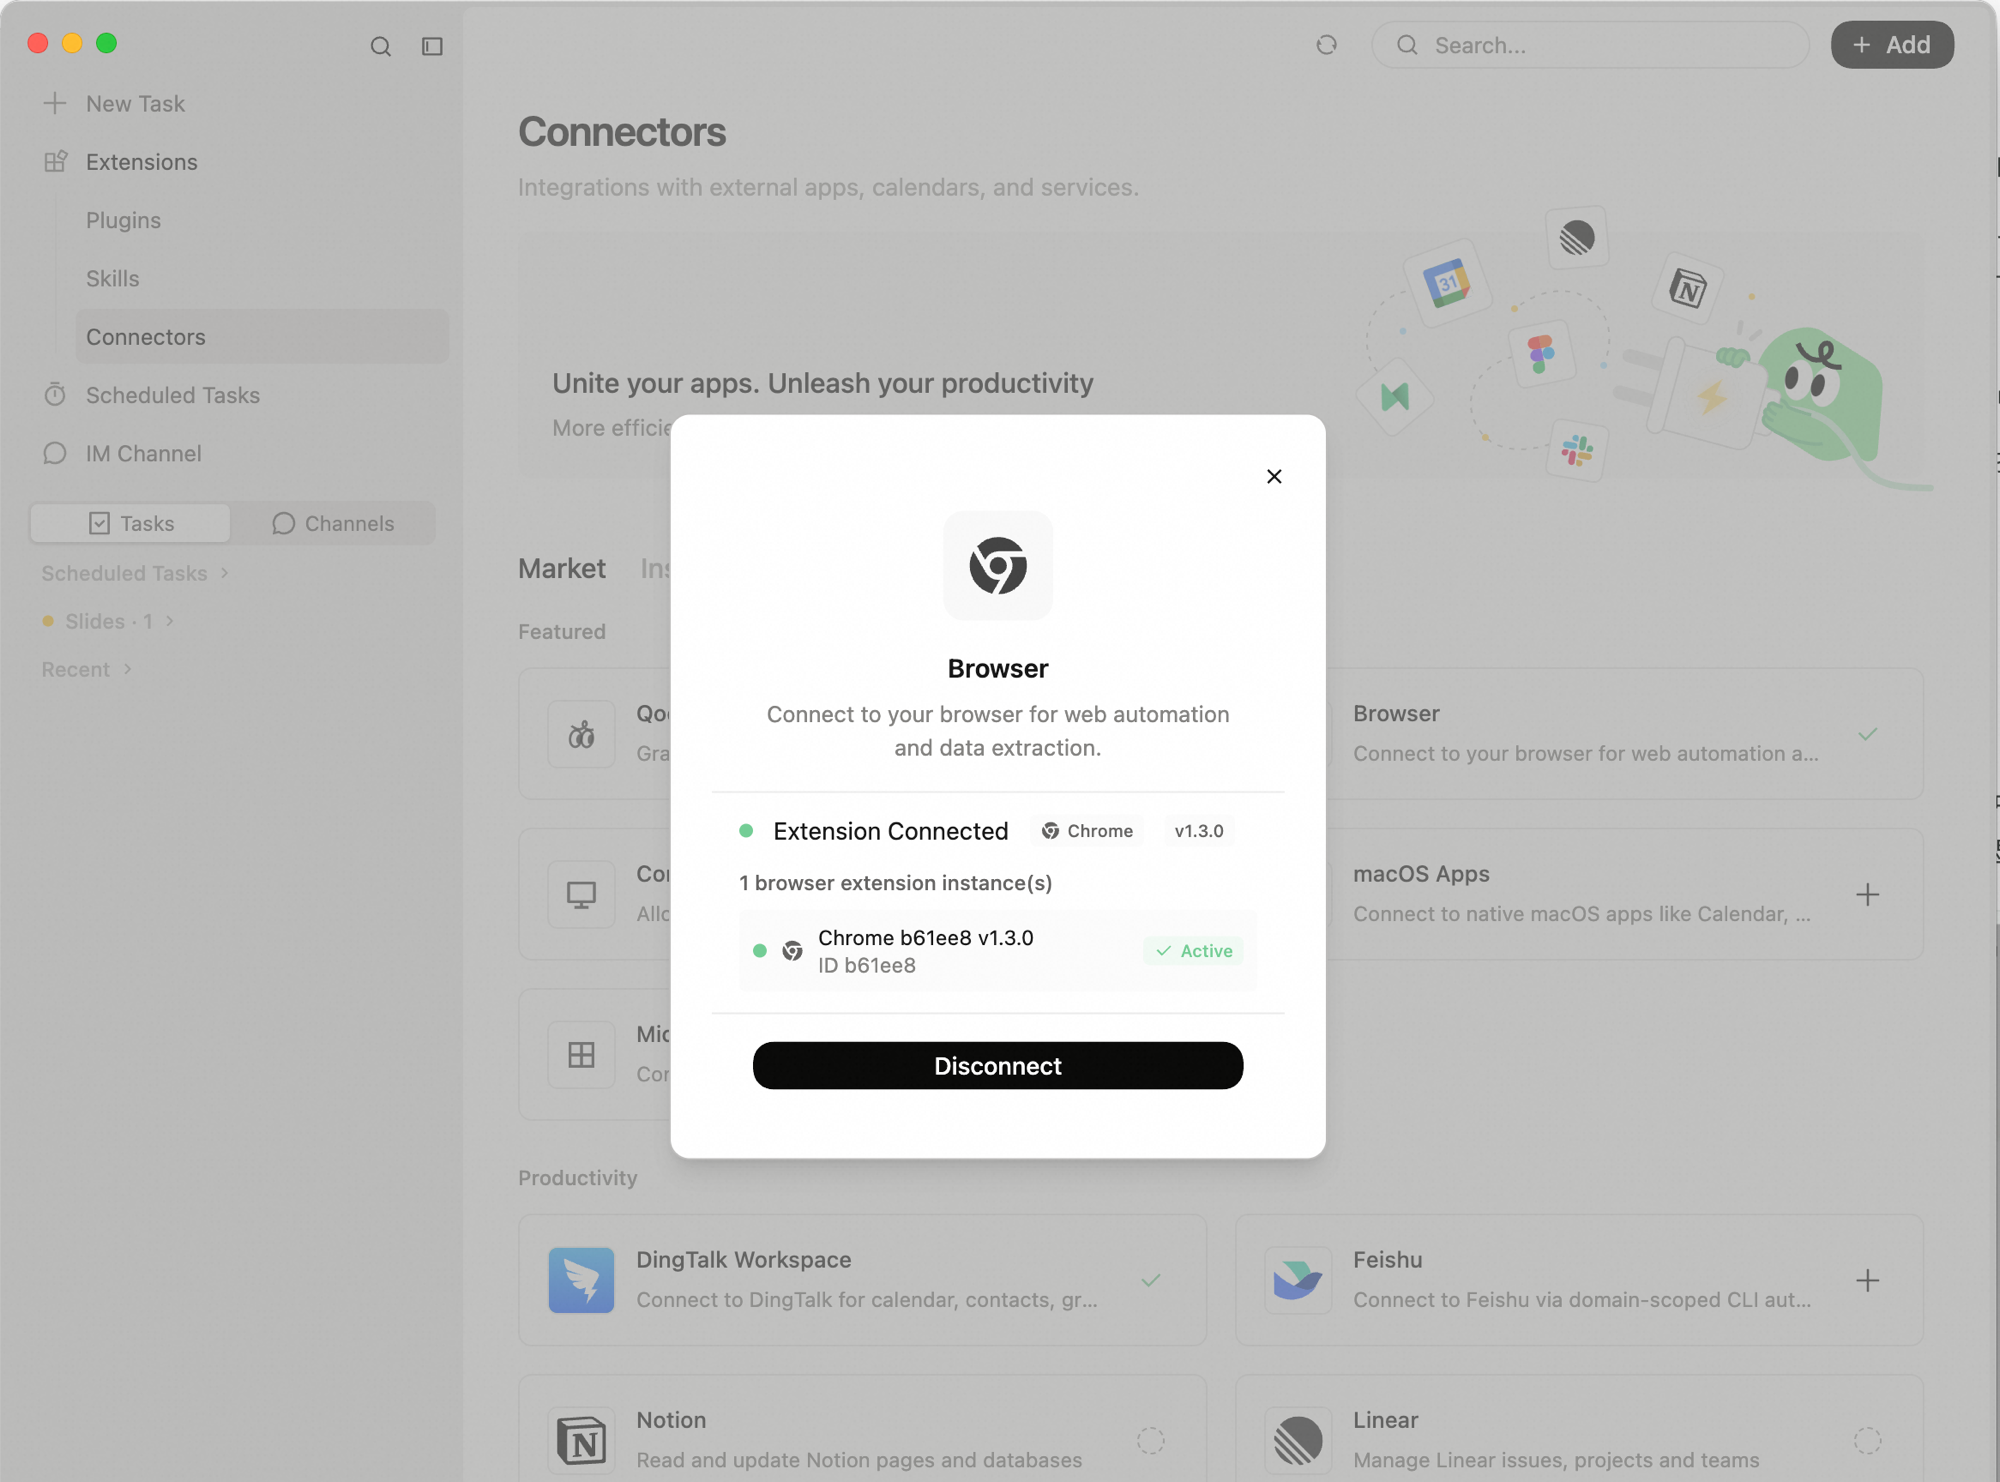
Use cases
Data collection and research
macOS Apps
The macOS connector lets QoderWork read and write data in your Mac's built-in apps — turning Calendar, Mail, Reminders, and more into an AI-accessible workspace.
Supported apps
Find the macOS connector under the left sidebar under Extensions → Connectors and enable each app individually:
Reminders
Create tasks, set due dates, and mark items complete. Works as your AI-powered to-do manager.
Calendar
View today's schedule, create events, and check for conflicts. Helps you plan your day.
Notes
Save meeting notes, key takeaways, or quick ideas from conversations directly into Notes.
Read emails and create drafts. Summarize your inbox, extract key info, and draft replies.
Contacts
Look up contact details, search by name or company, and create new entries.
The first time you enable an app, macOS will ask for permission (e.g., "QoderWork wants to access your Calendar"). Grant access once and you won't be asked again.
Use cases
Quick schedule management
Microsoft 365
The Microsoft 365 connector lets QoderWork securely access your Microsoft account, bringing your cross-platform work into the AI's reach. Once connected, QoderWork can triage your Outlook inbox, manage your schedule, track your To Do lists, and interact with your OneDrive files.
Setup
Before using it, you'll need to authorize your account:
-
Go to the left sidebar under Extensions → Connectors, find Microsoft 365, and click Connect Microsoft Account.
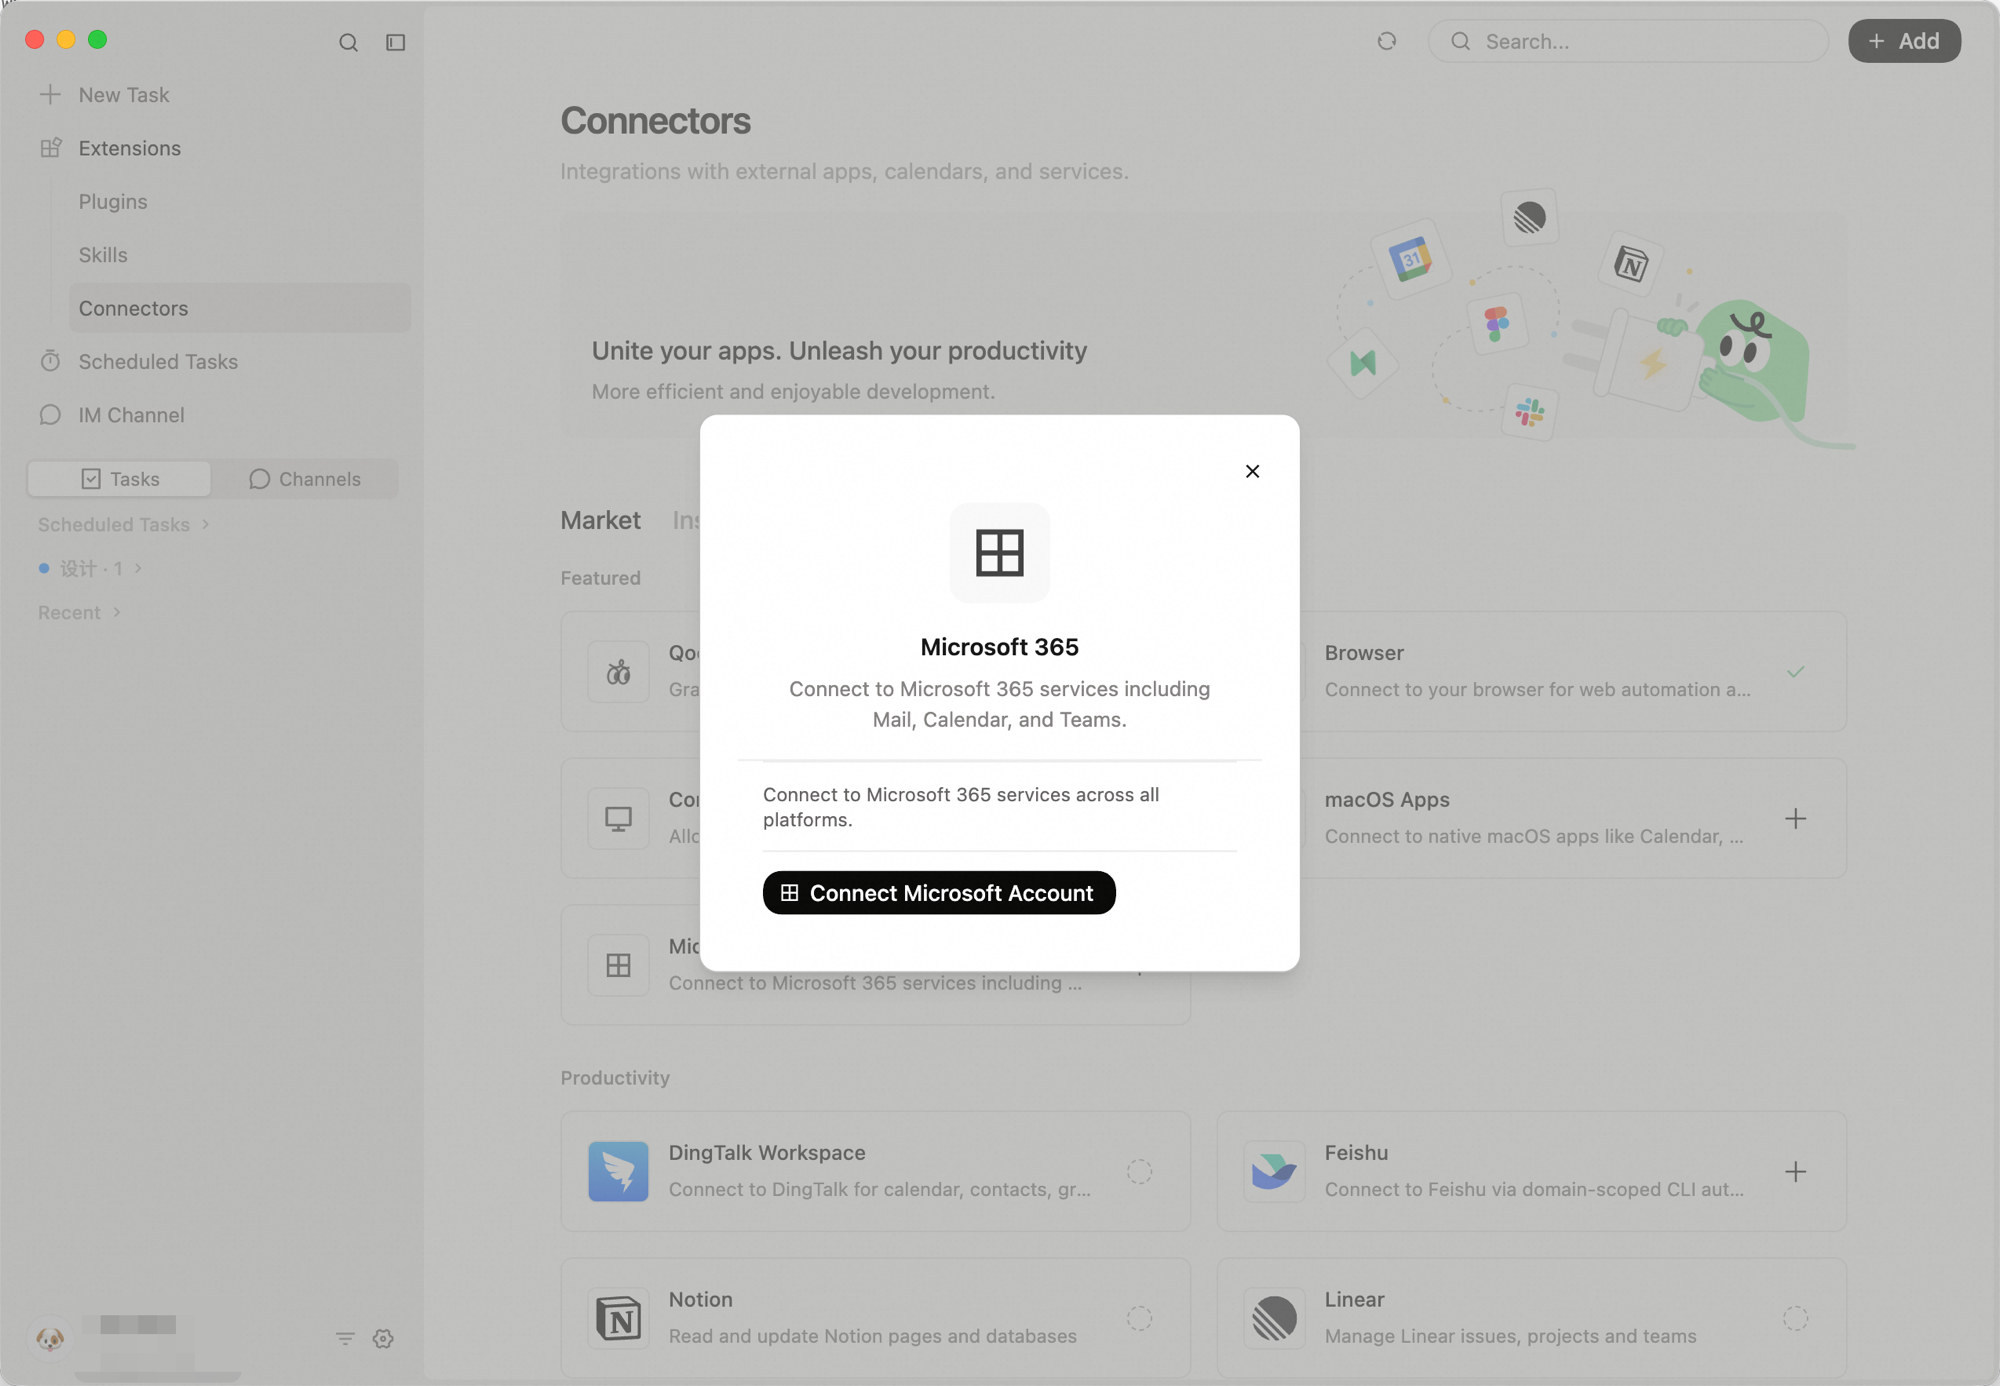
- A browser window will open. Log in to your Microsoft account.
- Review the permission request (e.g., "QoderWork MS365 Connector needs your permission...") and grant access once — you won't be asked again.
Supported apps
Once connected, you can enable each service individually under the Microsoft 365 settings:
Read, send, and manage your Outlook emails and drafts. Summarize your inbox, draft replies, or dig up specific threads.
Calendar
View and manage your schedule. Check for conflicts, plan your day, and send out new meeting invites.
Contacts
Search and manage your Outlook contacts. Quickly pull up contact info for colleagues and clients.
To Do
Track your personal tasks and lists in Microsoft To Do. Add new action items or check off completed ones.
Notes
Access your OneNote notebooks, sections, and pages. Save meeting minutes or pull context from your existing notes.
Files
Browse and read your OneDrive files and Excel spreadsheets. Quickly locate cloud documents or extract data from tables.
Use cases
Inbox and schedule triage
DingTalk Workspace
DingTalk links QoderWork to your organization’s DingTalk tenant. Instead of clicking through stacked menus, you describe what you need in plain language—create to-dos, submit or draft daily reports, and work with attendance and calendar flows your tenant exposes to the app.
Why you’d want this
Routinely handling tasks in DingTalk often requires tedious navigation: finding the right app in the workbench, clicking into forms, filling out details, and submitting. This connector allows QoderWork to interface directly with DingTalk (DWS), condensing these multi-page, multi-step operations into a single natural language instruction so you can stay in your current context.
Core capabilities
Depending on what your administrator enables, the connector uses LLMs to operate across more than ten DingTalk modules. Typical capabilities include:
- To-do management: For example, if you say “Finish the three-sheet review at 8 PM today,” the AI automatically parses the time and content to create a task. You can also view your to-do list, update statuses, or modify goals directly in the chat window without leaving the editor.
- Daily reports: Stop manually drafting logs. QoderWork can automatically gather your to-dos and completed work (such as commits or task updates), format them into a clear report, and push it directly to DingTalk. This applies to weekly and monthly reports as well, requiring no page switching or template opening.
- Attendance & schedules: Initiate attendance check-ins, view schedules, or manage calendar bookings within the scopes granted to the connector.
- Approval workflows: Quickly submit or process various approval flows when your organization exposes them (based on DingTalk configurations).
Setup
1
Open the DingTalk connector
In the left sidebar, go to Extensions → Connectors, switch to the Market tab, and find the DingTalk card.
2
Sign in to DingTalk
Click the card. A Sign in with DingTalk dialog opens — read the permission summary and click Sign in with DingTalk at the bottom to authorize.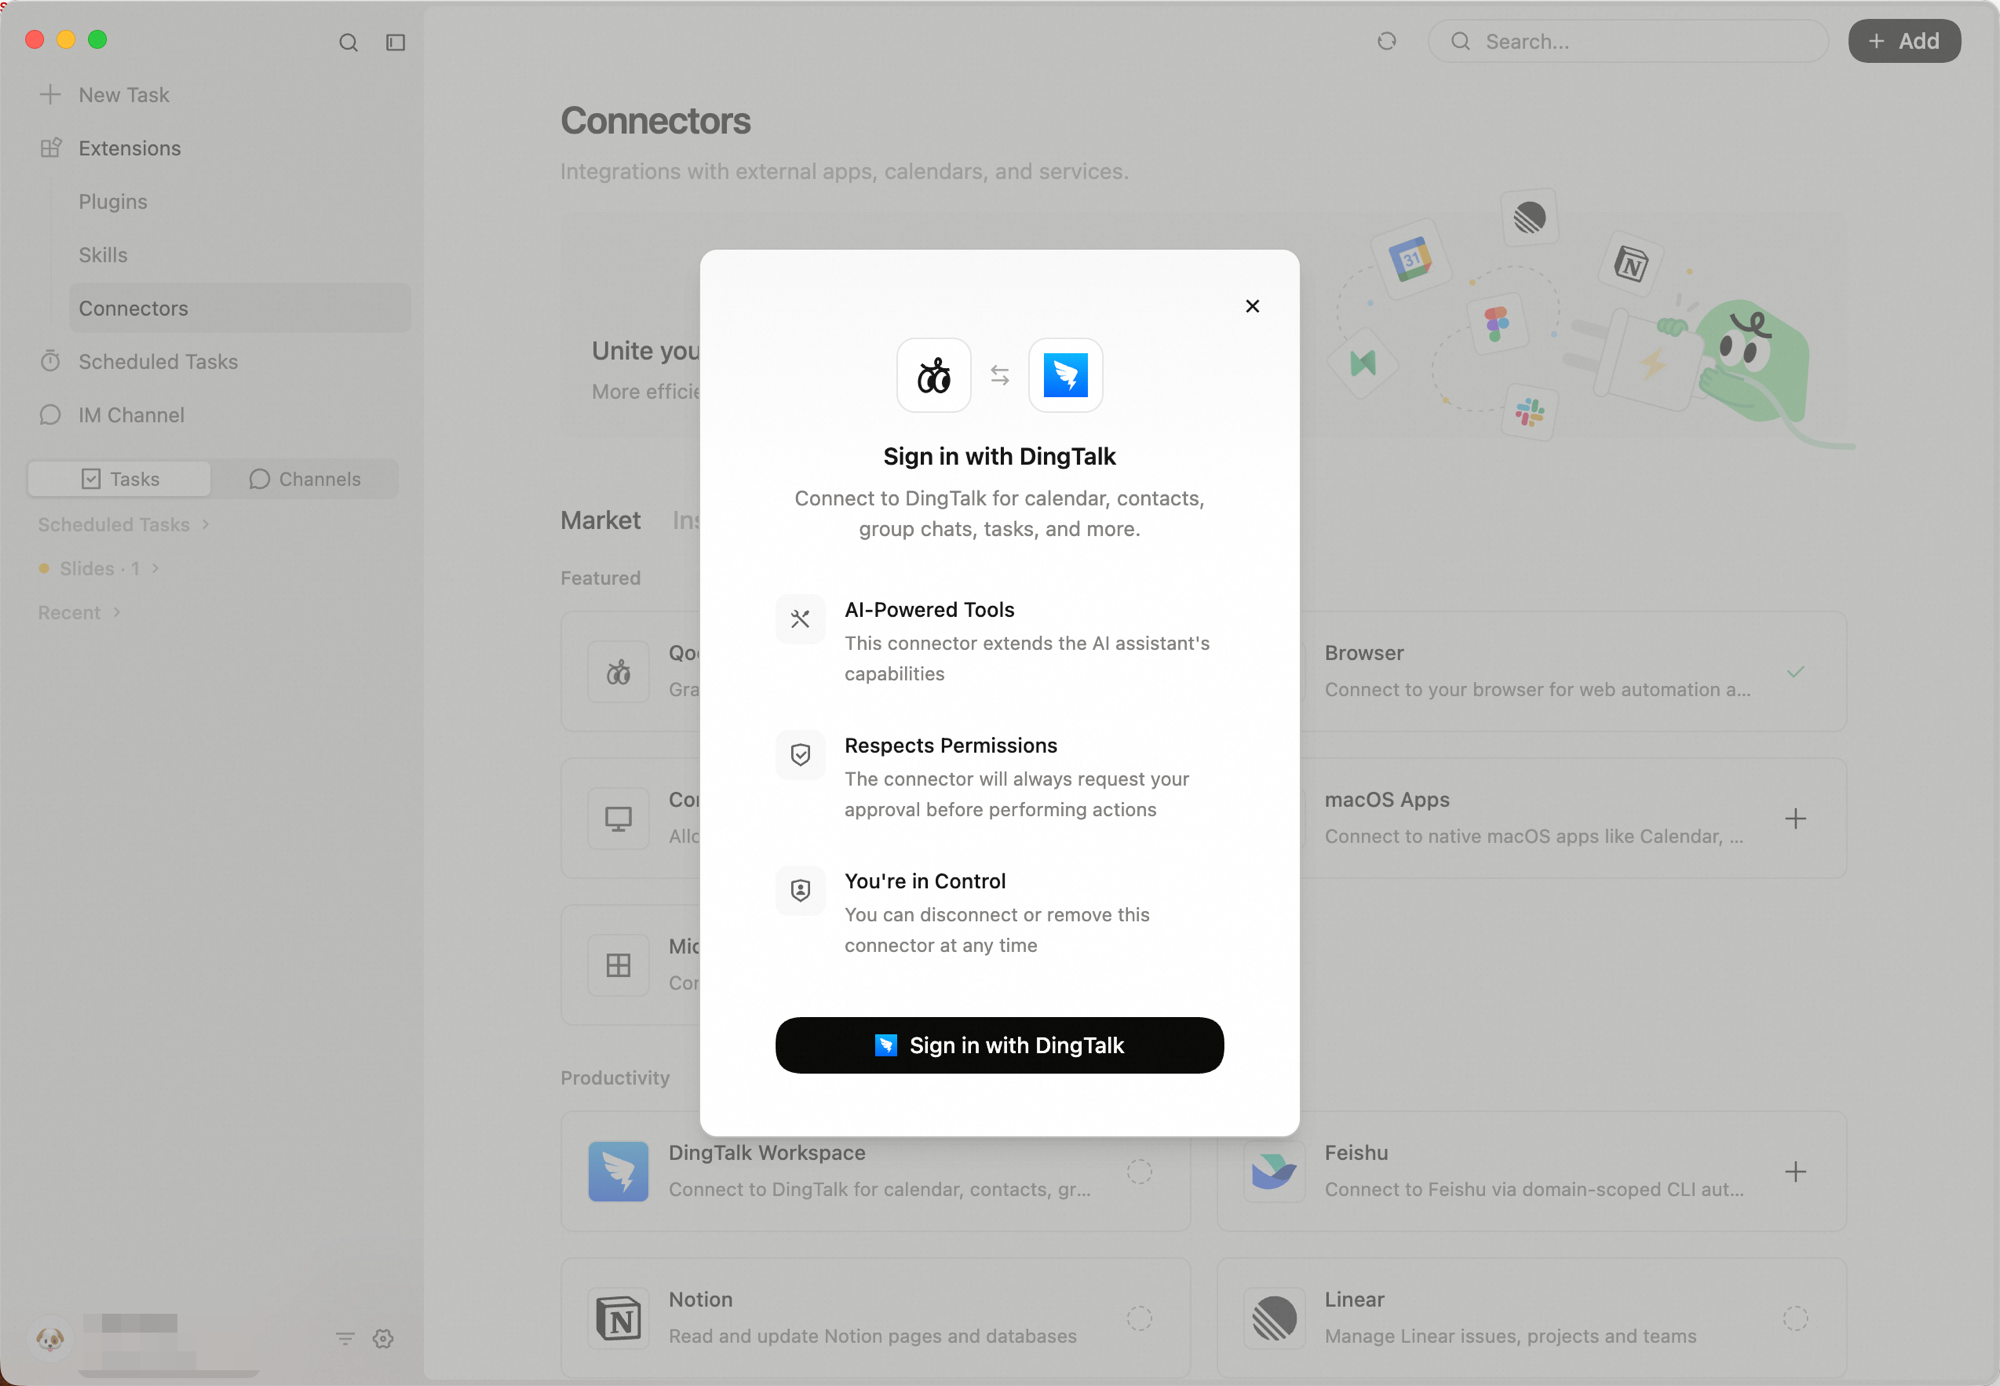
3
Confirm installation
After authorization, the connector appears under Installed for management.
Use cases
Create a DingTalk to-do
Custom MCP Servers
MCP (Model Context Protocol) is an open standard that lets AI applications plug into external tools and data sources through a unified interface. Think of it as USB-C for AI — just as USB lets any peripheral work out of the box, MCP gives AI a single way to talk to any external service.
Out of the box, QoderWork can only work with what's in your conversation. Add MCP, and it can manage your calendar, search your docs, pull live data, and much more — turning it from a chatbot into an assistant that actually gets things done.
How It Works
MCP follows a client-server model:
- MCP Client — QoderWork itself. It sends requests and displays results.
- MCP Server — A service deployed by a provider (Firecrawl, Slack, etc.) that performs specific operations and returns data.
Adding an MCP Server
Open the QoderWork desktop app and go to the left sidebar under Extensions → Connectors. Click + Add in the top-right — you'll see two options.
Paste JSON Config
The fastest path if you already have a JSON config from an MCP marketplace or provider. Click + Add → Paste JSON Config — the Import from JSON dialog opens. Paste your config and click Import.
Fill in Config Manually
Prefer filling things in yourself? Click + Add → Fill in Config Manually. In the Add MCP Server dialog that appears, start by selecting a Server Type from the dropdown. Each type shows a different set of fields:
Streamable HTTP / SSE
For remotely hosted MCP services accessed via URL. This is the most common type offered by MCP marketplaces — simple to configure and recommended as your first choice.- Server Name — A label you'll recognize.
- Server URL — The endpoint URL copied from the MCP marketplace.
- Headers (Optional) — Authentication headers like
Authorization: Bearer your-token. Click + Add Header to enter them manually, or Paste to bulk-import from your clipboard.
STDIO
For locally running MCP servers launched via the command line. Best suited for developers working with local tools or CLI integrations. This requires the relevant runtime (Node.js, Python, etc.) to be installed on your machine.- Server Name — A label you'll recognize.
- Command — The full launch command, e.g.,
npx -y @modelcontextprotocol/server-filesystem. - Environment Variables (Optional) — Key-value pairs the service needs at runtime (API keys, access tokens, etc.). Add them one by one with + Add Variable, or click Paste to import in bulk.
Managing MCP servers
Open the Connectors page and switch to the Installed tab. Your added MCP servers appear under Custom. From here you can:
- Toggle a server on or off.
- Expand a server to see its available tools.
- Edit or delete a server using the icons next to it.
Combining connectors
When multiple connectors are enabled, QoderWork can work across apps in a single task:
Browser + Calendar
Best practices
Provide explicit URLs
When using the browser connector, give a direct URL in your prompt rather than asking the AI to find the site. "Open https://analytics.google.com" beats "find Google Analytics" every time.
Combine connectors with file I/O
Connectors pair naturally with QoderWork's local file capabilities. Scrape data from a website and save it as a local Excel file, or read a local spreadsheet and fill out a web form — data flows freely between browser, native apps, and your filesystem.
Test complex flows manually first
For multi-step workflows involving page navigation or app switching, walk through the flow once in a regular conversation. Once it works, save the prompt as a Skill or scheduled task so you can reuse it.
Lean into human-AI collaboration
CAPTCHAs, QR-code logins, and two-factor prompts are things the AI can't handle alone. When it hits one, step in and complete the verification — the AI picks up right where it left off once you're through.
FAQ
I enabled a connector but the conversation says the tool isn't available?
I enabled a connector but the conversation says the tool isn't available?
After toggling a connector on or off, you need to start a new conversation for it to take effect. It won't appear in an existing chat.
What do I do about login pages or CAPTCHAs?
What do I do about login pages or CAPTCHAs?
QoderWork can't bypass CAPTCHAs, SMS verification, or QR-code logins automatically. Complete the verification yourself and the AI will continue from the logged-in state.
macOS denied the permission request — how do I fix it?
macOS denied the permission request — how do I fix it?
If you clicked "Don't Allow" the first time, go to System Settings → Privacy & Security, find the relevant category (Calendar, Reminders, etc.), and add QoderWork to the allowed list.
Is it normal for browser actions to be slower than regular chat?
Is it normal for browser actions to be slower than regular chat?
Yes. The browser connector needs to capture and analyze page content in real time, which involves screenshots and element parsing. Network conditions and page complexity also affect speed. For data-heavy tasks, break the prompt into smaller steps.
I added a server but it isn't working. What should I check?
I added a server but it isn't working. What should I check?
Run through this checklist:
- Confirm the JSON config or URL was copied in full and is correctly formatted.
- Check your network connection. Some MCP servers require specific network access or VPN.
- Verify whether the service needs an extra authorization or login step.
- Remove the server from Connectors → Installed and re-add it.
MCP calls feel slow. Is that normal?
MCP calls feel slow. Is that normal?
Response time depends on the service provider. Most calls return within a few seconds. If you're seeing persistent timeouts, check your network first, then contact the provider.