> ## Documentation Index
> Fetch the complete documentation index at: https://docs.qoder.com/llms.txt
> Use this file to discover all available pages before exploring further.
# IM Channels
QoderWork completes conversations and tasks on the desktop client by default. However, since most of your work communication likely happens in instant messaging (IM) apps, you can connect QoderWork to your favorite chat tools by enabling IM Channels. Whether you're commuting or between meetings, you can simply @ the bot in your IM to run tasks, query data, or organize documents, and the results will be sent directly back to your current chat window.
The desktop client remains the control center: all IM sessions have corresponding session windows on the desktop, where you can check progress, take over operations, or adjust configurations like MCP, Skills, and Connectors at any time. These configurations apply to all IM sessions.
QoderWork currently supports the following IM platforms:
| Platform | Connection Method | Suitable Scenarios |
| :------------ | :------------------------------------------------- | :------------------------------------------------------- |
| **DingTalk** | Scan QR code to bind quickly | Enterprise team collaboration |
| **Feishu** | Scan QR code to automatically create an app | Quick access for individuals or teams (Chinese mainland) |
| **Lark** | Scan QR code to automatically create an app | Quick access for individuals or teams |
| **WeChat** | Scan QR code to bind, ready to use immediately | Lightweight interaction on mobile |
| **WeCom Bot** | Scan QR code to bind quickly or configure manually | Internal enterprise collaboration and automation |
| **Slack** | Enter Bot / App tokens | Overseas team collaboration |
| **WhatsApp** | Scan QR code to bind | Customer-facing / mobile communication |
All IM channels are centrally managed on the **IM Channels** page.
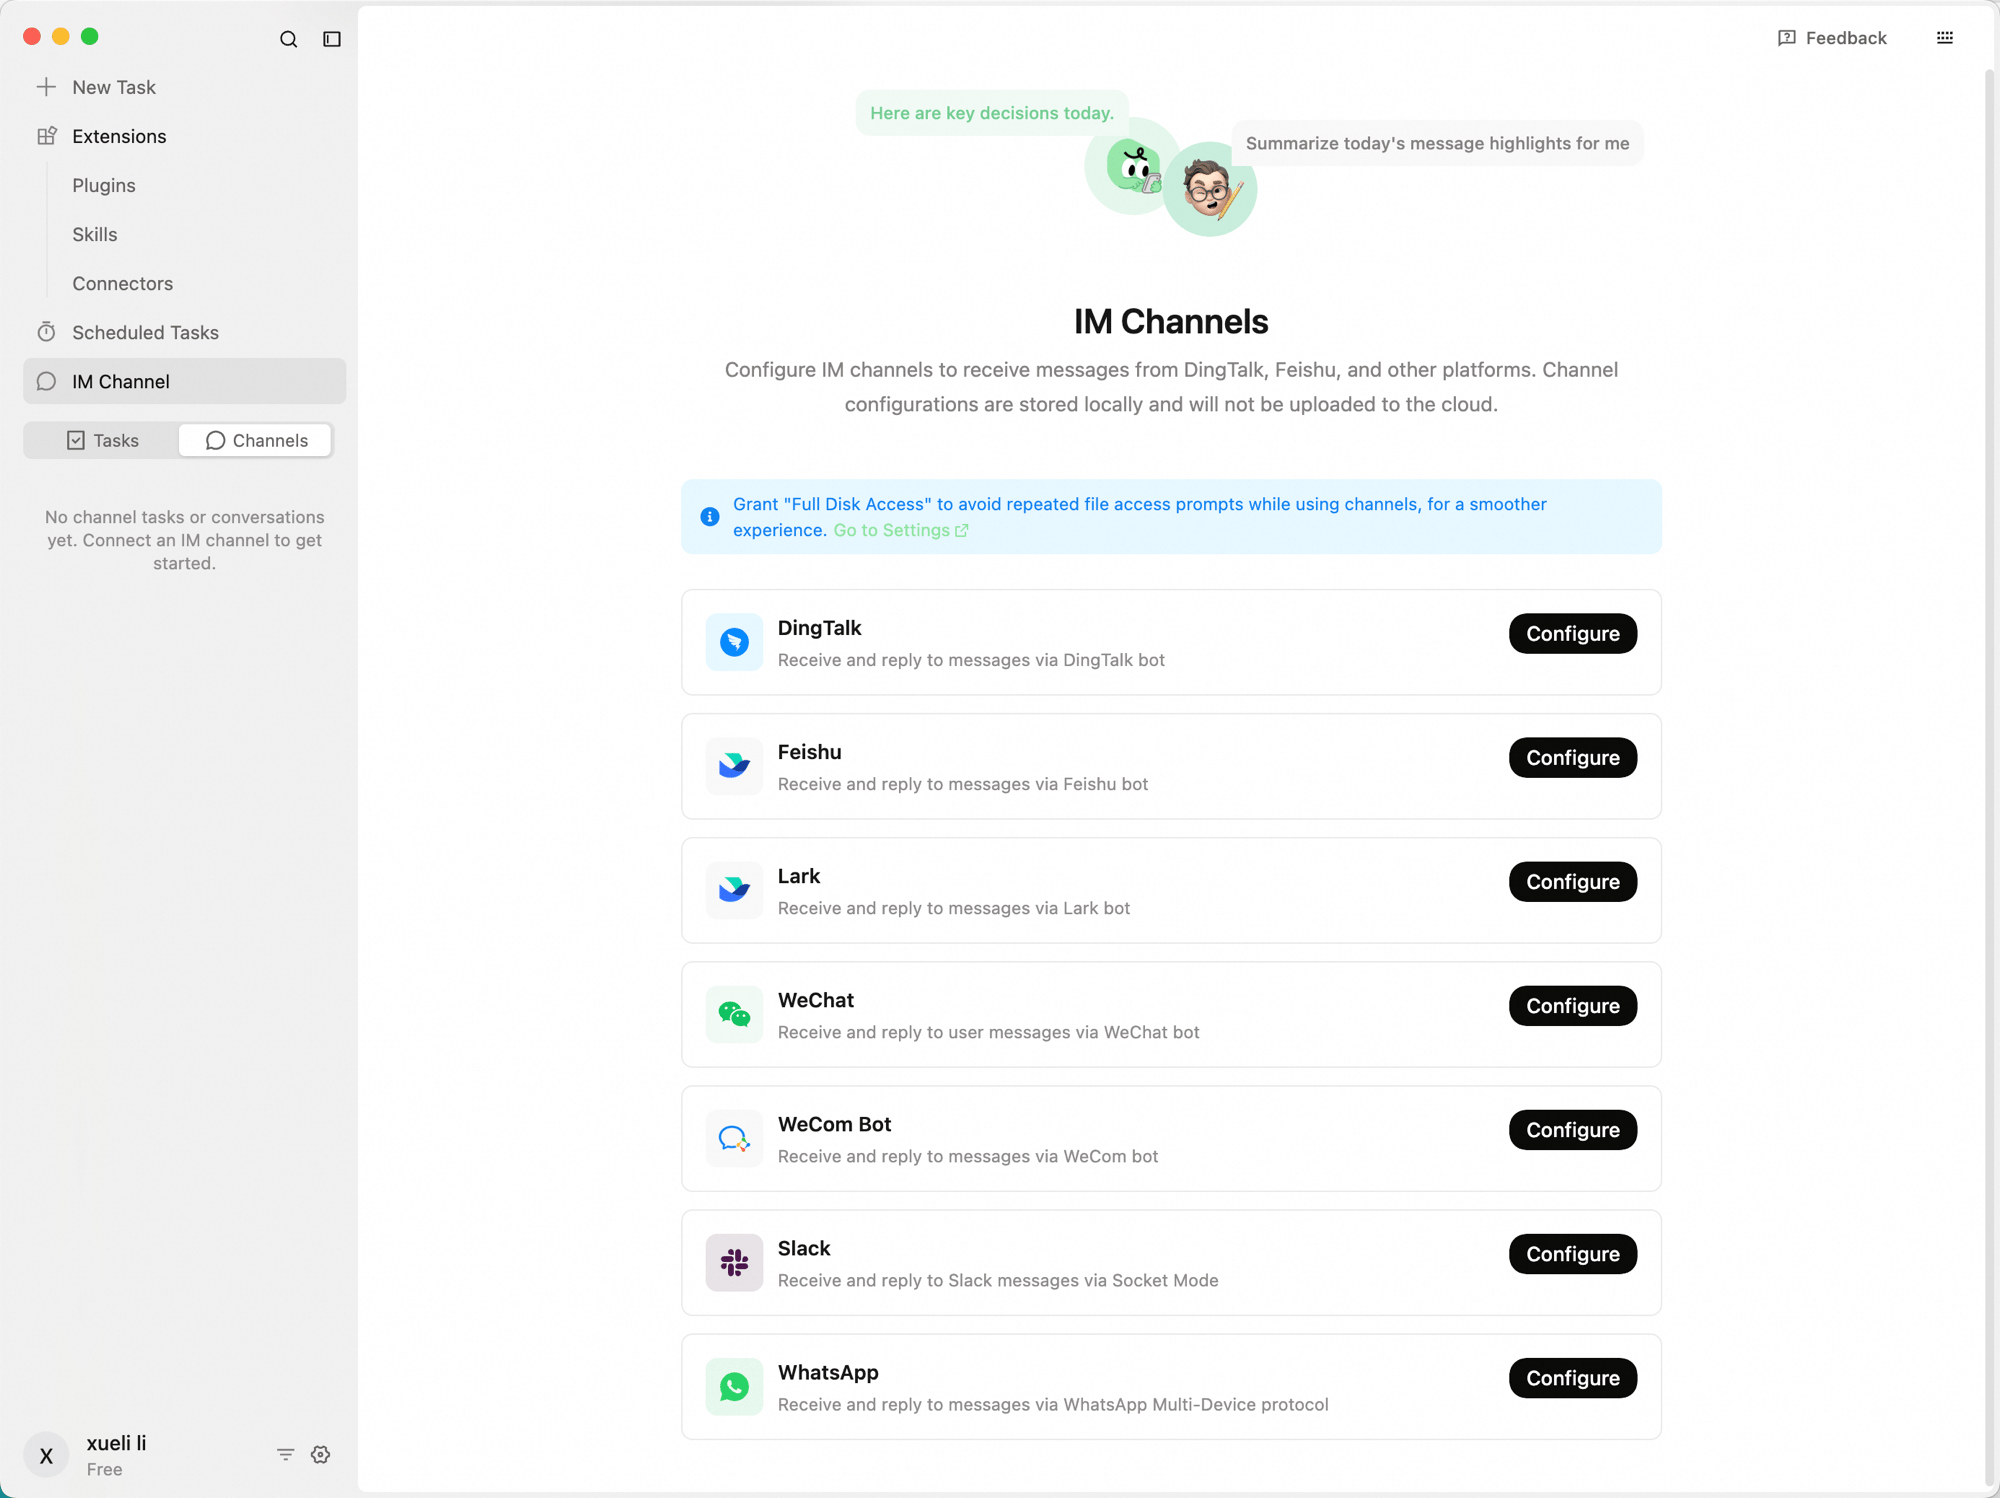 If your organization uses an enterprise team, team administrators can control which IM channel types are available to members. See [IM Channel Controls](/account/teams/im-channel-controls) for details.
## How It Works
IM integration follows one core principle: **Where it comes from, it goes back.**
When you send a message in an IM chat window, QoderWork processes it and automatically sends the result back to that exact same chat window. Tasks created directly on the desktop client will keep their results on the desktop and will not be pushed to any IM. Each IM session is mapped to an independent session window in the QoderWork desktop client, ensuring complete context isolation—different IM platforms and different chat windows do not interfere with each other. You can view the history and status of all IM sessions on the desktop, or continue operating in the corresponding session window on the desktop, and the output will still be synced back to the IM.
## Supported Message Types
In any connected IM channel, you can send the following types of messages:
| Message Type | Description |
| :----------------- | :------------------------------------------------------------------------------------------ |
| Text | Send text commands directly |
| Image | Send images; supports OCR, background replacement, and other processing |
| File | Supports common formats like PDF, Excel, PPT, Word, CSV, TXT, etc. |
| Voice | Send voice messages; automatically recognizes content and executes operations |
| Forwarded Messages | Multiple forwarded messages will be parsed correctly |
| Image + Text | Correlates images with text commands, e.g., sending an image and saying "Extract the table" |
When sending multiple messages consecutively, the system will process them in order without dropping or reordering them.
IM Channels can be used in conjunction with [Scheduled Tasks](/qoderwork/scheduled-tasks). When creating a scheduled task, you can specify an IM session as the destination for the results. Once the task is completed, the results will be automatically pushed to that chat window. For example: "Generate a daily data report at 9 AM every day and send it to the DingTalk group."
## Access Policies
| Policy | Description |
| :--------------- | :------------------------------------------------------------------------------------ |
| **Open Mode** | Everyone and all groups can chat directly with the bot without additional operations. |
| **Pairing Mode** | The bot can only be used in a specific session after you grant permission. |
Open Mode is suitable for quick rollout and use within a team; Pairing Mode is ideal for scenarios where you need to control the scope of use, such as restricting access to specific personnel.
In Pairing Mode, when a user privately messages the bot or @mentions the bot in a group, a pairing request is automatically triggered. You can click **Allow** in the "Pairing Management" section of the channel card to approve the request. Pairing is session-based: once allowed in a private chat, that user can converse; once allowed in a group chat, all members in that group can converse.
## Connect to DingTalk
You can receive and reply to user messages via a DingTalk bot. QoderWork provides a way to connect a DingTalk bot: Configure in QoderWork.
### Configure in QoderWork
In QoderWork, go to **IM Channels**, find the "DingTalk" card, and click **Configure**.
The "Configure DingTalk" window will pop up, displaying the QR code interface by default.
Open DingTalk, scan the QR code to complete the app registration and binding. If the QR code expires, click **Refresh QR Code** at the bottom.
After successful binding, select an access policy:
* **Open Mode**: Everyone / groups can converse directly
* **Pairing Mode**: Requires your permission before the session can use the bot
Return to QoderWork and confirm that the DingTalk status shows as "Connected". You can now use the bot in DingTalk.
### How to Use
**Private Chat**: Search for the bot's name in the search box at the top of DingTalk, click to enter the chat window, and send messages directly.
**Group Chat**: After adding the bot to a group chat, @mention the bot in the group to send messages. How to add: Click Group Settings (top right corner) → Bots → Add Bot → Search for and select the bot you created.
The "Belonging Organization" of the group chat must match the organization used when creating the bot, otherwise the bot cannot be found via search.
## Connect to Feishu / Lark
### Configure in QoderWork
In QoderWork, go to **IM Channels**, find the "Feishu" or "Lark" card, and click **Configure**.
A QR code will be displayed at the top of the page. Open the Feishu / Lark App, scan the QR code, and confirm authorization. The system will automatically create an application under your organization and configure the required permissions and event callbacks.
After successful authorization, select an access policy:
* **Open Mode**: Everyone / groups can converse directly
* **Pairing Mode**: Requires your permission before the session can use the bot
Return to QoderWork and confirm that the status shows as "Connected". You can now use the bot in Feishu / Lark.
### How to Use
**Private Chat**: Search for the bot's name in the Feishu / Lark search box and click to enter the chat window.
**Group Chat**: Add the bot to the group chat and @mention the bot to send messages.
## Connect to WeChat
Simply scan the QR code to complete the binding; no additional configuration is required.
In QoderWork, go to **IM Channels**, find the "WeChat" card, and click **Configure**.
The page will display a QR code. Open WeChat, scan the QR code, and confirm authorization.
Once binding is complete, wait for the status to change to "Connected". You can then start a conversation by sending messages directly to QoderWork in WeChat.
## Connect to WeCom Bot
You can receive and reply to user messages via a WeCom bot. QoderWork provides two ways to connect a WeCom bot: Quick Setup and Manual Configuration.
### Method 1: Quick Setup (Recommended)
This is the simplest and fastest way to connect. Just scan the QR code to complete the binding.
In QoderWork, go to **IM Channels**, find the "WeCom Bot" card, and click **Configure**.
In the pop-up "Configure WeCom Bot" window, select **Quick Setup (Recommended)**.
Open WeCom, scan the QR code to complete the bot creation and binding. If the QR code expires, click **Refresh QR Code** at the bottom.
### Method 2: Manual Configuration
Create a bot in the WeCom admin console and obtain the bot's **Bot ID** and **Secret**.
In QoderWork's "Configure WeCom Bot" window, select **Manual**, enter the obtained Bot ID and Secret, and click **Save**.
## Connect to Slack
Receive and reply to Slack messages. You'll provide your Slack **Bot Token** and **App-Level Token**.
In QoderWork, go to **IM Channels**, find the "Slack" card, and click **Configure**.
In the "Configure Slack" dialog, enter both tokens (from your Slack app):
* **Bot Token** (starts with `xoxb-`)
* **App-Level Token** (starts with `xapp-`)
Select an **Access Policy**:
* **Pairing**: requires your approval before a conversation can be used
* **Open**: anyone can start a conversation directly
Optionally click **Test connection** to verify, then click **Save**. Once the status shows "Connected", DM the bot in Slack or @-mention it in a channel to start chatting.
## Connect to WhatsApp
In QoderWork, go to **IM Channels**, find the "WhatsApp" card, and click **Configure**.
On your phone, open WhatsApp and scan the QR code shown in QoderWork.
Once linked and the status shows "Connected", message the bot directly in WhatsApp to start chatting.
## Managing IM Channels
The configuration and status of all IM channels are centrally managed on the **IM Channels** page.
### Enable and Disable
There is a toggle switch on each channel card. When turned on, the status shows as "Connected", and the IM side can be used normally; when turned off, messages sent from the IM side will no longer receive replies. Turning it off does not clear the configuration; simply turn it back on to restore service.
### Delete Channel
If you need to completely remove a channel's configuration, click **Remove Configuration** on the channel card. After removal, all configuration information for that channel will be cleared, and the IM side will no longer respond. To enable it again, you will need to reconfigure it.
### Switch Access Policy
DingTalk, Feishu, and Lark channels support switching between Open Mode and Pairing Mode at any time:
* **Switching from Open to Pairing**: After switching, previously unpaired users will no longer be able to use the bot. They will need to trigger a new pairing request and obtain permission.
* **Switching from Pairing to Open**: After switching, all users can use the bot directly without pairing.
### Parallel Multi-Channels
You can enable all IM channels simultaneously. Each channel is completely independent and does not interfere with the others—DingTalk, Feishu, Lark, and WeChat sessions each have their own independent context and history.
## Task Binding (Remote Takeover)
QoderWork allows you to intervene in standard desktop tasks via IM, enabling remote interaction with tasks so you can operate QoderWork anytime, anywhere.
**Prerequisites**:
1. At least one IM channel (e.g., DingTalk, WeChat) is enabled.
2. A standard task has been created and exists on the QoderWork desktop client.
In any connected IM channel, you can use the following commands to manage task binding:
* `/bind`: View the list of currently bindable tasks. Reply with `/bind ` (e.g., `/bind 1`) to bind the current IM session to the specified desktop task. Once bound, messages you send in the IM will be forwarded directly to that task, and the task's replies will be synced to the IM in real time.
* `/unbind`: Unbind the current IM session from the desktop task. After unbinding, the IM session will revert to a standard independent session.
After binding a task, you can continue conversing with the running desktop task on your phone—for example, asking it to report current progress, adding new instructions, or providing required verification codes.
## Typical Scenarios
### Lightweight Mobile Chat
Ask the bot questions directly in your IM, perfect for simple Q\&A and quick queries:
```plaintext theme={null}
Help me find the quote sent to Company XX
```
The bot will invoke configured MCP tools and data sources to reply with the results directly in the IM.
### Image and File Processing
Simply send images or files received or taken on your phone to the bot for processing:
```plaintext theme={null}
(Send a PDF contract) Review this contract, focusing on the risk points in the breach of contract clauses
```
Supports OCR text recognition, background replacement, receipt information extraction, file summarization, format conversion, data analysis, and more.
### Remote Delegation
When you're out and temporarily want your desktop QoderWork to do some work:
```plaintext theme={null}
Help me organize "Q1 Sales Data.xlsx" on my desktop into an analysis report,
including sales trends, customer distribution, and MoM changes, and save it as a PDF to the desktop.
```
QoderWork executes in the background, and automatically sends the result summary and file back to the IM session upon completion.
### Scheduled Task Result Push
Use in conjunction with [Scheduled Tasks](/qoderwork/scheduled-tasks) to automatically push execution results to IM:
```plaintext theme={null}
Help me create a scheduled task: generate a summary of yesterday's operation data at 9 AM every day,
and send the results to the DingTalk "Daily Operations" group when finished.
```
### Group Chat Collaboration
@mention the bot in a team group chat, and all group members can use it:
```plaintext theme={null}
@QoderWork Help me summarize the main points discussed in the group today
```
## Next Steps
Run tasks automatically on a schedule
Connect browser, calendar, Microsoft 365, DingTalk, and more
If your organization uses an enterprise team, team administrators can control which IM channel types are available to members. See [IM Channel Controls](/account/teams/im-channel-controls) for details.
## How It Works
IM integration follows one core principle: **Where it comes from, it goes back.**
When you send a message in an IM chat window, QoderWork processes it and automatically sends the result back to that exact same chat window. Tasks created directly on the desktop client will keep their results on the desktop and will not be pushed to any IM. Each IM session is mapped to an independent session window in the QoderWork desktop client, ensuring complete context isolation—different IM platforms and different chat windows do not interfere with each other. You can view the history and status of all IM sessions on the desktop, or continue operating in the corresponding session window on the desktop, and the output will still be synced back to the IM.
## Supported Message Types
In any connected IM channel, you can send the following types of messages:
| Message Type | Description |
| :----------------- | :------------------------------------------------------------------------------------------ |
| Text | Send text commands directly |
| Image | Send images; supports OCR, background replacement, and other processing |
| File | Supports common formats like PDF, Excel, PPT, Word, CSV, TXT, etc. |
| Voice | Send voice messages; automatically recognizes content and executes operations |
| Forwarded Messages | Multiple forwarded messages will be parsed correctly |
| Image + Text | Correlates images with text commands, e.g., sending an image and saying "Extract the table" |
When sending multiple messages consecutively, the system will process them in order without dropping or reordering them.
IM Channels can be used in conjunction with [Scheduled Tasks](/qoderwork/scheduled-tasks). When creating a scheduled task, you can specify an IM session as the destination for the results. Once the task is completed, the results will be automatically pushed to that chat window. For example: "Generate a daily data report at 9 AM every day and send it to the DingTalk group."
## Access Policies
| Policy | Description |
| :--------------- | :------------------------------------------------------------------------------------ |
| **Open Mode** | Everyone and all groups can chat directly with the bot without additional operations. |
| **Pairing Mode** | The bot can only be used in a specific session after you grant permission. |
Open Mode is suitable for quick rollout and use within a team; Pairing Mode is ideal for scenarios where you need to control the scope of use, such as restricting access to specific personnel.
In Pairing Mode, when a user privately messages the bot or @mentions the bot in a group, a pairing request is automatically triggered. You can click **Allow** in the "Pairing Management" section of the channel card to approve the request. Pairing is session-based: once allowed in a private chat, that user can converse; once allowed in a group chat, all members in that group can converse.
## Connect to DingTalk
You can receive and reply to user messages via a DingTalk bot. QoderWork provides a way to connect a DingTalk bot: Configure in QoderWork.
### Configure in QoderWork
In QoderWork, go to **IM Channels**, find the "DingTalk" card, and click **Configure**.
The "Configure DingTalk" window will pop up, displaying the QR code interface by default.
Open DingTalk, scan the QR code to complete the app registration and binding. If the QR code expires, click **Refresh QR Code** at the bottom.
After successful binding, select an access policy:
* **Open Mode**: Everyone / groups can converse directly
* **Pairing Mode**: Requires your permission before the session can use the bot
Return to QoderWork and confirm that the DingTalk status shows as "Connected". You can now use the bot in DingTalk.
### How to Use
**Private Chat**: Search for the bot's name in the search box at the top of DingTalk, click to enter the chat window, and send messages directly.
**Group Chat**: After adding the bot to a group chat, @mention the bot in the group to send messages. How to add: Click Group Settings (top right corner) → Bots → Add Bot → Search for and select the bot you created.
The "Belonging Organization" of the group chat must match the organization used when creating the bot, otherwise the bot cannot be found via search.
## Connect to Feishu / Lark
### Configure in QoderWork
In QoderWork, go to **IM Channels**, find the "Feishu" or "Lark" card, and click **Configure**.
A QR code will be displayed at the top of the page. Open the Feishu / Lark App, scan the QR code, and confirm authorization. The system will automatically create an application under your organization and configure the required permissions and event callbacks.
After successful authorization, select an access policy:
* **Open Mode**: Everyone / groups can converse directly
* **Pairing Mode**: Requires your permission before the session can use the bot
Return to QoderWork and confirm that the status shows as "Connected". You can now use the bot in Feishu / Lark.
### How to Use
**Private Chat**: Search for the bot's name in the Feishu / Lark search box and click to enter the chat window.
**Group Chat**: Add the bot to the group chat and @mention the bot to send messages.
## Connect to WeChat
Simply scan the QR code to complete the binding; no additional configuration is required.
In QoderWork, go to **IM Channels**, find the "WeChat" card, and click **Configure**.
The page will display a QR code. Open WeChat, scan the QR code, and confirm authorization.
Once binding is complete, wait for the status to change to "Connected". You can then start a conversation by sending messages directly to QoderWork in WeChat.
## Connect to WeCom Bot
You can receive and reply to user messages via a WeCom bot. QoderWork provides two ways to connect a WeCom bot: Quick Setup and Manual Configuration.
### Method 1: Quick Setup (Recommended)
This is the simplest and fastest way to connect. Just scan the QR code to complete the binding.
In QoderWork, go to **IM Channels**, find the "WeCom Bot" card, and click **Configure**.
In the pop-up "Configure WeCom Bot" window, select **Quick Setup (Recommended)**.
Open WeCom, scan the QR code to complete the bot creation and binding. If the QR code expires, click **Refresh QR Code** at the bottom.
### Method 2: Manual Configuration
Create a bot in the WeCom admin console and obtain the bot's **Bot ID** and **Secret**.
In QoderWork's "Configure WeCom Bot" window, select **Manual**, enter the obtained Bot ID and Secret, and click **Save**.
## Connect to Slack
Receive and reply to Slack messages. You'll provide your Slack **Bot Token** and **App-Level Token**.
In QoderWork, go to **IM Channels**, find the "Slack" card, and click **Configure**.
In the "Configure Slack" dialog, enter both tokens (from your Slack app):
* **Bot Token** (starts with `xoxb-`)
* **App-Level Token** (starts with `xapp-`)
Select an **Access Policy**:
* **Pairing**: requires your approval before a conversation can be used
* **Open**: anyone can start a conversation directly
Optionally click **Test connection** to verify, then click **Save**. Once the status shows "Connected", DM the bot in Slack or @-mention it in a channel to start chatting.
## Connect to WhatsApp
In QoderWork, go to **IM Channels**, find the "WhatsApp" card, and click **Configure**.
On your phone, open WhatsApp and scan the QR code shown in QoderWork.
Once linked and the status shows "Connected", message the bot directly in WhatsApp to start chatting.
## Managing IM Channels
The configuration and status of all IM channels are centrally managed on the **IM Channels** page.
### Enable and Disable
There is a toggle switch on each channel card. When turned on, the status shows as "Connected", and the IM side can be used normally; when turned off, messages sent from the IM side will no longer receive replies. Turning it off does not clear the configuration; simply turn it back on to restore service.
### Delete Channel
If you need to completely remove a channel's configuration, click **Remove Configuration** on the channel card. After removal, all configuration information for that channel will be cleared, and the IM side will no longer respond. To enable it again, you will need to reconfigure it.
### Switch Access Policy
DingTalk, Feishu, and Lark channels support switching between Open Mode and Pairing Mode at any time:
* **Switching from Open to Pairing**: After switching, previously unpaired users will no longer be able to use the bot. They will need to trigger a new pairing request and obtain permission.
* **Switching from Pairing to Open**: After switching, all users can use the bot directly without pairing.
### Parallel Multi-Channels
You can enable all IM channels simultaneously. Each channel is completely independent and does not interfere with the others—DingTalk, Feishu, Lark, and WeChat sessions each have their own independent context and history.
## Task Binding (Remote Takeover)
QoderWork allows you to intervene in standard desktop tasks via IM, enabling remote interaction with tasks so you can operate QoderWork anytime, anywhere.
**Prerequisites**:
1. At least one IM channel (e.g., DingTalk, WeChat) is enabled.
2. A standard task has been created and exists on the QoderWork desktop client.
In any connected IM channel, you can use the following commands to manage task binding:
* `/bind`: View the list of currently bindable tasks. Reply with `/bind ` (e.g., `/bind 1`) to bind the current IM session to the specified desktop task. Once bound, messages you send in the IM will be forwarded directly to that task, and the task's replies will be synced to the IM in real time.
* `/unbind`: Unbind the current IM session from the desktop task. After unbinding, the IM session will revert to a standard independent session.
After binding a task, you can continue conversing with the running desktop task on your phone—for example, asking it to report current progress, adding new instructions, or providing required verification codes.
## Typical Scenarios
### Lightweight Mobile Chat
Ask the bot questions directly in your IM, perfect for simple Q\&A and quick queries:
```plaintext theme={null}
Help me find the quote sent to Company XX
```
The bot will invoke configured MCP tools and data sources to reply with the results directly in the IM.
### Image and File Processing
Simply send images or files received or taken on your phone to the bot for processing:
```plaintext theme={null}
(Send a PDF contract) Review this contract, focusing on the risk points in the breach of contract clauses
```
Supports OCR text recognition, background replacement, receipt information extraction, file summarization, format conversion, data analysis, and more.
### Remote Delegation
When you're out and temporarily want your desktop QoderWork to do some work:
```plaintext theme={null}
Help me organize "Q1 Sales Data.xlsx" on my desktop into an analysis report,
including sales trends, customer distribution, and MoM changes, and save it as a PDF to the desktop.
```
QoderWork executes in the background, and automatically sends the result summary and file back to the IM session upon completion.
### Scheduled Task Result Push
Use in conjunction with [Scheduled Tasks](/qoderwork/scheduled-tasks) to automatically push execution results to IM:
```plaintext theme={null}
Help me create a scheduled task: generate a summary of yesterday's operation data at 9 AM every day,
and send the results to the DingTalk "Daily Operations" group when finished.
```
### Group Chat Collaboration
@mention the bot in a team group chat, and all group members can use it:
```plaintext theme={null}
@QoderWork Help me summarize the main points discussed in the group today
```
## Next Steps
Run tasks automatically on a schedule
Connect browser, calendar, Microsoft 365, DingTalk, and more